Initializing a project
With .NET 9, the .NET team focused on improving the quality, stability, and performance of Blazor applications. Thankfully, there are no breaking changes between .NET 8, so you can safely raise the target framework of your application. However, with .NET 8, Blazor got a whole new solution type and rendering experience, so we’ll review the steps required to initialize a new project here.
Let’s initialize a Blazor Web App with a per-component rendering scope. It’s a strategic choice for our cookbook as it enables me to highlight various render mode caveats while we explore different areas of web development.
Getting ready
In this recipe, we’ll showcase initializing the project with the GUI provided as part of Visual Studio. So, start your IDE and dive in.
If you’re using the .NET CLI in your environment, I’ll provide equivalent commands in the There’s more... section.
How to do it...
Perform the following steps to initialize the Blazor Web App project:
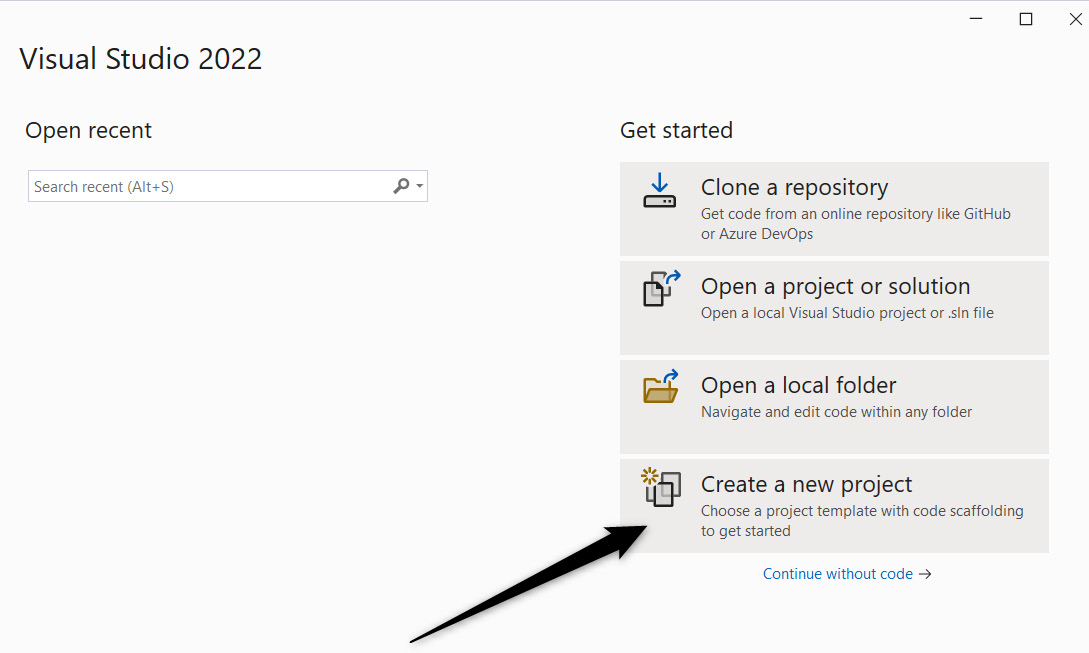
- Start Visual Studio and select Create a new project from the welcome window:

Figure 1.1: Navigating to the project creation panel
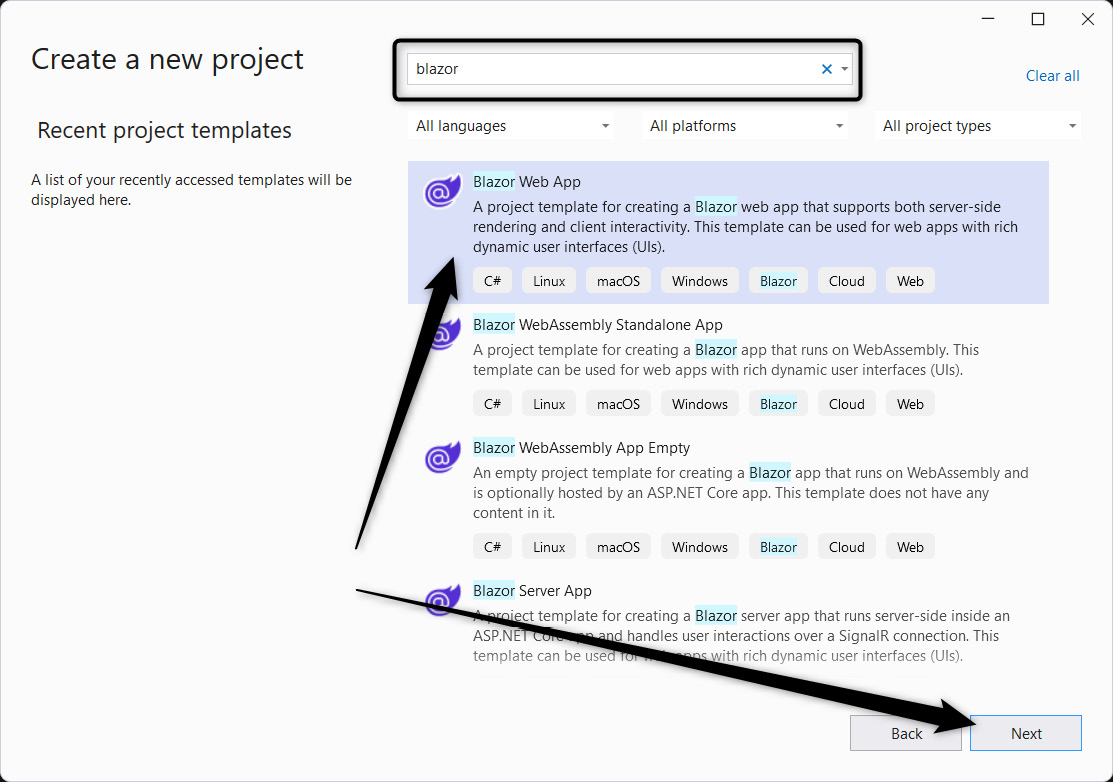
- Use the search bar at the top of the next panel to narrow the list of available project types, select Blazor Web App, and confirm your choice by clicking Next:

Figure 1.2: Selecting Blazor Web App from the available project types
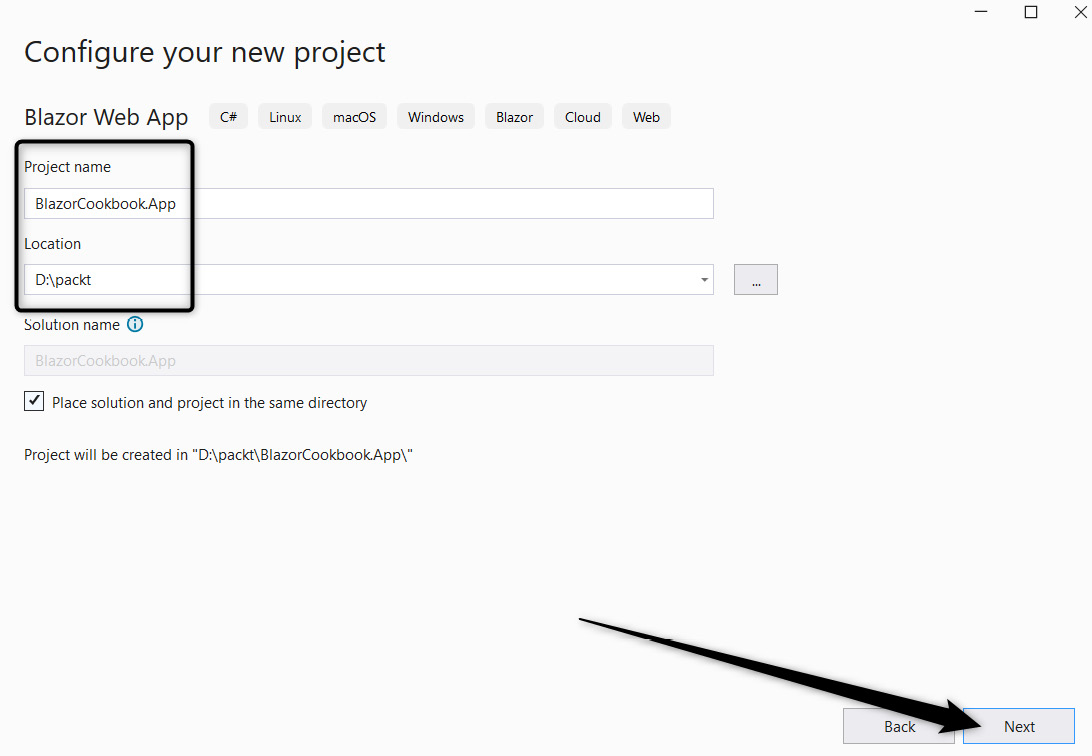
- On the Configure your new project panel, define the project’s name and location and confirm these details by clicking Next:

Figure 1.3: Setting the name and location of the new project
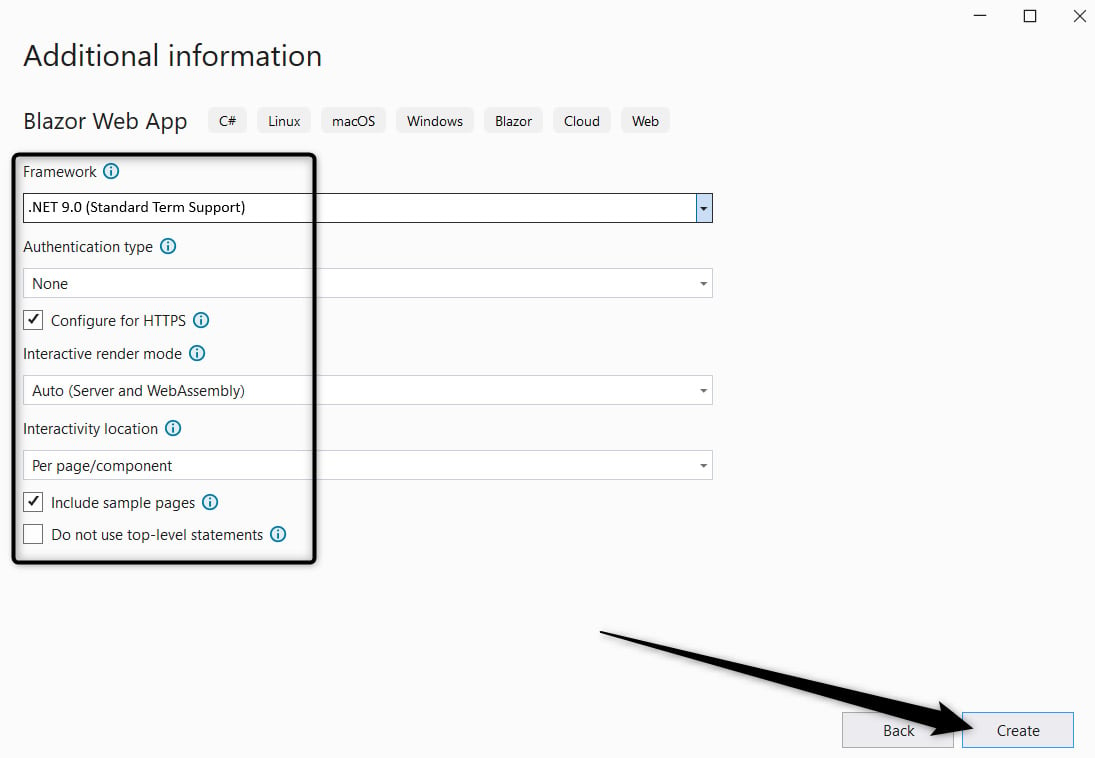
- On the Additional information panel, choose the following options:
- .NET 9.0 (Standard Term Support) under Framework
- Auto (Server and WebAssembly) under Interactive render mode
- Per page/component under Interactivity location
On top of that, check the Include sample pages checkbox. Confirm your choice by clicking Create:

Figure 1.4: Configuring the project’s framework and interactivity
Here’s what your initial solution structure will look like:

Figure 1.5: Initial project structure
How it works...
In step 1, we started Visual Studio and selected the Create a new project option from the welcome menu. Since Visual Studio comes with many project templates preinstalled, in step 2, we utilized the search bar at the top of the panel and, by searching for the blazor keyword, we quickly found and selected Blazor Web App from the results list. We proceeded to the next stage by clicking the Next button. In step 3, we defined the project name and location. For this book, I chose BlazorCookbook.App and D:\packt. We continued the setup process by clicking Next.
In step 4, we configured the project. Considering that we’ll focus on Blazor in .NET 9, we chose .NET 9.0 (Standard Term Support) from the Framework dropdown. Then, we chose a render mode for our application from the Interactive render mode dropdown. With the None option, we effectively indicate that Blazor should use server-side rendering (SSR) mode. SSR is the fastest render mode as the markup is statically generated on the server but offers limited to no interactivity. When we expect interactivity, we must choose from the interactive modes. Here, Server (represented in the code as InteractiveServer) renders components on the server with UI interactions managed via a SignalR connection, allowing dynamic content updates while keeping component logic server-side. Alternatively, WebAssembly (InteractiveWebAssembly) renders components directly in the browser using WebAssembly, facilitating fully interactive experiences without server communication for UI updates. Lastly, with the Auto (Server and WebAssembly) option (InteractiveAuto), we let Blazor select the best rendering method based on the current environment state and network conditions. We want to explore various render mode behaviors, so Auto (Server and Webassembly) was the best option for us. For Interactivity location, we selected Per page/component so that we can define render modes at the component level, as opposed to Global, which would set the render mode globally across the project. We also checked the Include sample pages box to trigger the scaffold of a basic layout and CSS. We intentionally left Authentication type set to None to avoid unnecessary complexity, although we plan to revisit authentication in Chapter 8. We finalized the project creation process by clicking Create.
At this point, you should see the initial project structure. If you spot two projects, BlazorCookbook.App and BlazorCookbook.App.Client, that’s correct. Here, BlazorCookbook.App represents the server-side components of our application, while BlazorCookbook.App.Client is the client-side part that compiles into WebAssembly code. Everything that’s placed in BlazorCookbook.App.Client will be transmitted to the user’s browser, so you shouldn’t place any sensitive or confidential information there. Since BlazorCookbook.App references BlazorCookbook.App.Client, there’s no need to duplicate code, regardless of how it’s rendered initially.
There’s more...
If your IDE doesn’t have a GUI similar to Visual Studio, you can leverage the cross-platform .NET CLI. Navigate to your working directory and run the following command to initialize a Blazor Web App project with the same configuration that was outlined in step 4:
dotnet new blazor -o BlazorCookbook.App -int Auto --framework net9.0


