Understanding CSS modules
A recent pattern that has become popular in the reactive framework world is CSS modules. Frontend development always faces the issue of conflicting CSS class names, ill-structured BEM code, and confusing CSS file structures. Vue components help to solve this by being modular and allowing you to compose CSS that will generate unique class names for the specific component at compile time.
Using CSS modules in Vue exports CSS styles from the style section into JavaScript modules and uses those styles in the template and logic computing.
To enable this feature in Vue, you will need to add the module attribute to the style block, and reference as classes using the :class and $style.<class name> syntax, as shown here:
<template>
    <div :class="$style.container">CSS modules</div>
</template>
<style module>
.container {
  width: 100px;
  margin: 0 auto;
  background: green;
}
</style>
Once you have enabled the CSS module, the Vue engine exposes the $style object containing all the defined selectors as objects for use within the template section, and this.$style to use within the component’s JavaScript logic. In the preceding example, you are binding the CSS stylings defined for the.container class selector to div using $style.container.
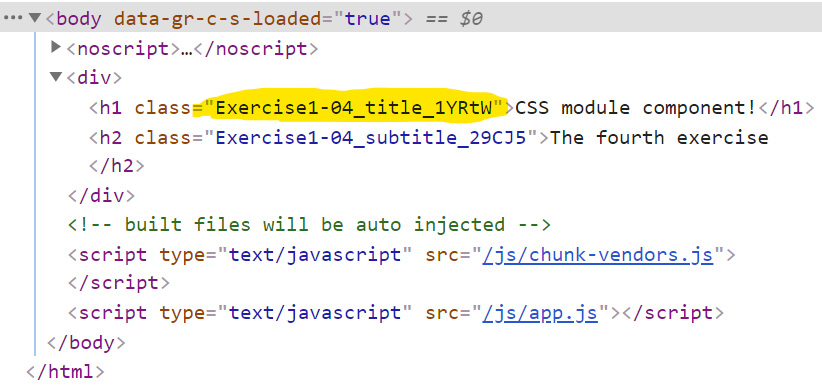
If you inspected the DOM tree, that class would be called something such as .container_ABC123. If you were to create multiple components that had a semantic class name such as .container but used CSS modules, you would never run into style conflicts again.
Now, let’s practice using CSS modules to style a Vue component.
Exercise 1.12 – styling Vue components using CSS modules
To access the code file for this exercise, refer to https://github.com/PacktPublishing/Frontend-Development-Projects-with-Vue.js-3/tree/v2-edition/Chapter01/Exercise1.12.
Let’s start by performing the following steps:
- Use the application generated with
npm init vue@3as a starting point, or within the root folder of the code repository, navigate into theChapter01/Exercise1.12folder by using the following commands in order:> cd Chapter01/Exercise1.12/ > yarn
- Run the application using the following command:
yarn dev
- Open the exercise project in VS Code (by using the
code .command within the project directory) or your preferred IDE. - Create a new Vue component file named
Exercise1-12.vuein thesrc/componentsdirectory. - Inside
Exercise1-12.vue, compose the following code:<template> <div> <h1>{{ title }}</h1> <h2>{{ subtitle }}</h2> </div> </template> <script> export default { data() { return { title: 'CSS module component!', subtitle: 'The fourth exercise', } }, } </script> - Add the
<style>block and addmoduleas an attribute instead ofscoped:<style module> h1, h2 { font-family: 'Avenir', Helvetica, Arial, sans-serif; text-align: center; } .title { font-family: 'Avenir', Helvetica, Arial, sans-serif; color: #2c3e50; margin-top: 60px; } .subtitle { color: #4fc08d; font-style: italic; } </style> - To use CSS modules in your template, you need to bind them to your HTML elements by using the
:classsyntax, which is the same as thev-bind:classdirective:<h1 :class="$style.title">{{ title }}</h1> <h2 :class="$style.subtitle">{{ subtitle }}</h2>
When you save it, your project should look something like this:

Figure 1.48 – Output using CSS modules
- If you inspect the virtual DOM, you will see how it has applied unique class names to the bound elements:

Figure 1.49 – Generated CSS module class
In this exercise, we saw how to use CSS modules in your Vue components and how it works differently from CSS scoping.
In combination with file splitting and importing SCSS, using CSS modules is the preferred method for scoping component styling here. This safely ensures that individual component styles and business rules do not risk overriding each other and do not pollute global styling and variables with component-specific styling requirements.
Readability is important. The class name also hints at the component name as opposed to the v-data attribute, which can be good when debugging large projects.
In the next section, you will apply what you have learned in this chapter to build a dynamic shopping list app by combining directives, loops, two-way data, and method declaration for a Vue component together, with scoped CSS styling.
Activity 1.01 – building a dynamic shopping list app using Vue
To access the code file for this activity, refer to https://github.com/PacktPublishing/Frontend-Development-Projects-with-Vue.js-3/tree/v2-edition/Chapter01/Activity1.01
This activity aims to leverage your knowledge thus far about the basic features of an SFC, such as expressions, loops, two-way binding, and event handling.
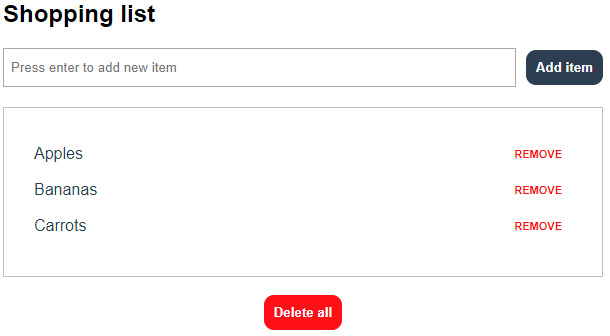
This application should let users create and delete individual list items and clear the total list in one click.
The following steps will help you complete the activity:
- Build an interactive form in one component using an input bound to
v-model. - Add one input field to which you can add shopping list items. Allow users to add items by using the Enter key by binding a method to the
@keyup.enterevent. - Users can expect to clear the list by deleting all the items or removing them one at a time. To facilitate this, you can use a
deletemethod, which can pass the array position as an argument, or simply overwrite the whole shopping list data prop with an empty array,[].
The expected outcome is as follows:

Figure 1.50 – Expected output of Activity 1.01


