Chapter 10. Internet of Things with the Raspberry Pi
In the previous chapter, we learned to interface different kinds of sensors to the Raspberry Pi to get data from the real world and output some text so that the user can infer the state of his surroundings, such as temperature, humidity, and so on. We also built a surveillance system that takes pictures of any intruder. Now, these are all standalone systems and cannot communicate with any other systems.
In this chapter, we will concentrate on the concept of the Internet of Things. This means that we can connect standalone systems, just like the ones we built in the previous chapters, to the Internet. We will connect devices to the Internet and learn how to interact with different web services. The following topics will be covered in this chapter:
- Installing the Twitter API for Python
- Using Tweepy
- Setting up a SQLite database
- Building a tweeting weather station
Introducing the Internet of Things
The Internet of Things is all about connecting the devices that were previously not connected to the Internet, in order to make them smarter and more controllable. Since the size and cost of electronic devices are dropping exponentially, we can now afford to incorporate them in our daily use, are garden watering systems, home automation/monitoring systems, and so on. The Internet of Things in this way has opened up a whole host of opportunities, the advantages of which are being taken up by hobbyists, startups, and major companies alike. At the heart of the Internet of Things revolution are small micro computers and sensors that allow these devices to connect to the Internet and exchange data between them.
As mentioned before, in this particular chapter we will extend our previous projects by connecting the Raspberry Pi to the Internet, and make additional projects to demonstrate the capability of the Internet of Things.
We will now learn to exchange data from the Twitter API and post our sensor readings to Twitter.
Installing the Twitter API for Python
API (Application Programming Interface) and it allows developers to communicate with various web services. Since Python is, by default, installed on the Raspberry Pi, we will use a Python script to communicate with the Twitter API over the Web. For this, we will use an open source library called Tweepy. It works with Python versions as old as 2.6 and is still under active development. So bugs are likely to be fewer and, if any are found, they are likely to be fixed quickly.
Note
The GitHub repository for Tweepy can be found at the following link, so that new issues can be submitted and the code can be understood much more clearly:
We will now proceed to install it and learn how to use it to do things such as sending tweets.
This library can be installed using pip, with the following command:
sudo pip install python-twitter
We can also install bleeding-edge versions of the library by cloning it from GitHub. Run the following command:
git clone https://github.com/tweepy/tweepy.git
cd tweepy
sudo python setup.py install
Note
You can also find more information about using Tweepy and the full extent of its capabilities on its official documentation website: http://tweepy.readthedocs.org/en/v3.5.0/.
Using Tweepy
Tweepy was built to be easy to set up and use, and in that regard it is of one of the most useable libraries for communicating with the Twitter API. It takes no more than four lines of code to set it up for use. However, before we can use it to communicate with our account on Twitter, we need to set up a developer app on Twitter. For this, we log on to https://apps.twitter.com, sign in to our Twitter account and hit Create New App, after which we will be greeted by a window that allows us to create a new application, as shown in the following window:
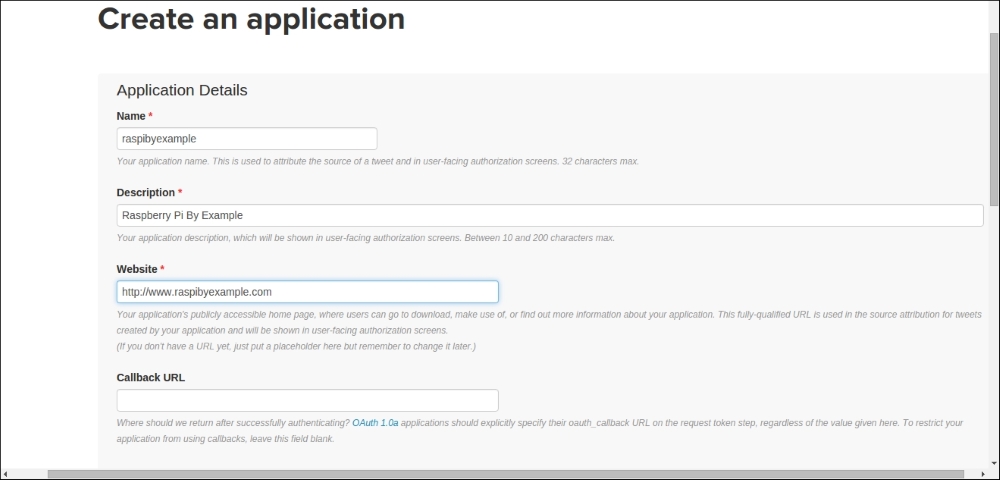
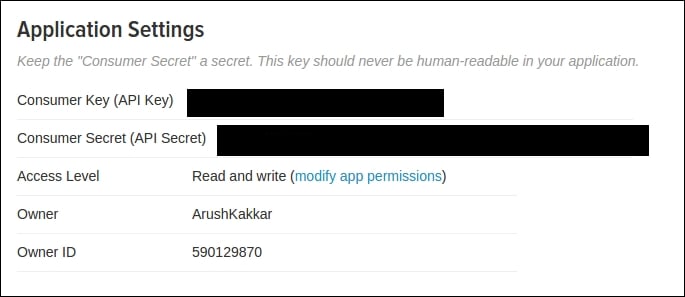
Fill in all the required details such as Name, Description, and Website. Remember, if you don't plan on using this app on a website, you can also put in a placeholder instead of an actual website. Finally, sign the developer agreement and you will have successfully created a Twitter app to use with your Python script. From this app, we will need a Consumer Secret (API Secret) and a Consumer Key (API Key) to use the Tweepy library, which is required for obtaining oauth authentication from the Twitter app. Next, we need to create an access code for our app that is required for communication with the Twitter API.
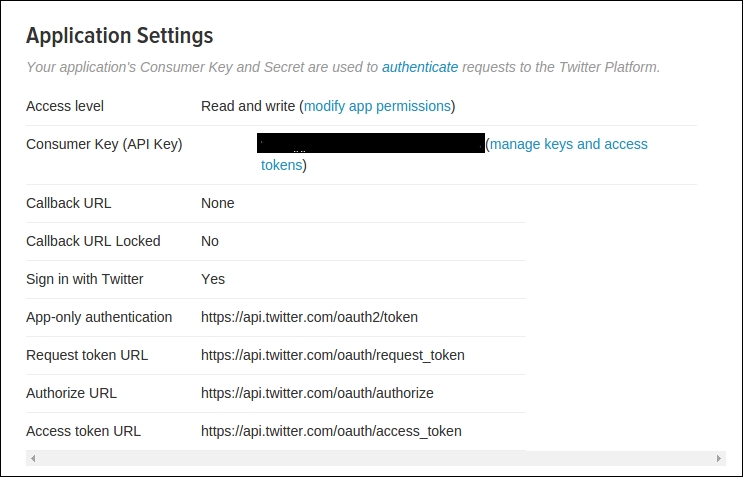
From the preceding page, click the manage keys and access tokens to get to the page where you can get your consumer codes and access tokens. The following menu will give the consumer keys:
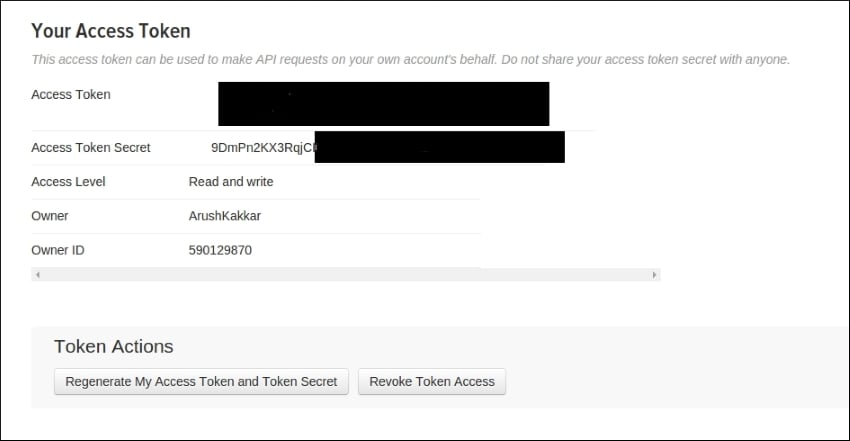
And the following screen will show us our application codes and also give an option to generate new access codes for our application:
We can now proceed to learn how to use Tweepy to get a list of followers. The code is given next, and the explanation follows:
import tweepy

auth = tweepy.OAuthHandler(consumer_key, consumer_secret)
auth.set_access_token(access_token, access_token_secret)

api = tweepy.API(auth)

user = api.get_user('twitter')

print user.screen_name
print user.followers_count
for friend in user.friends():
    print friend.screen_name

api.update_status(' Tweepy says : Hello, world!')
In this example, we first import the Tweepy library into Python to use its functionality. We first need to register our Python script (client) to be able to communicate with the Twitter API. For this, we will enter the Consumer Key and the Consumer Secret in the argument of the OAuthHandler method of the Tweepy API. Next, we set the access codes for opening up the Twitter API for our client's use. This is important because we need to have an access token for the app to be able to do things like send tweets, reading tweets, or viewing followers, and so on. Access codes for the Twitter app can be found in its settings, just below the Consumer Codes.
We have so far set the authentication details, but we still need to do the authentication to send tweets. This is accomplished by the API() function in the Tweepy module. We first create an api variable that contains all the methods for interacting with the Twitter API.
The next statement gets the user associated with our unique Consumer Key. Every registered user will have this key and it is unique for every user so they can correctly identify themselves. The get_user() method takes as an argument, the name of the service (Twitter in this case) that we need from the user, and passes the authentication codes that we have got from the previous statement to get the user details. This is stored in the user variable. This variable will have members such as the name, followers, following, and so on.
To check that we really get the correct user from this method, we only need to print the correct members of the user variable. So we first print to the command line, the screen name, and the follower count. The next while loop loops over the friends() method of the user variable and stores each follower detail in the friend variable. Then we print the name of each friend to the command line. This way, we can check if we have our user details correct or not.
Finally, we can send a tweet using the update_status() method of the Tweepy API. This method takes a string as input and sends out a tweet. However, if a string is more than 140 characters in length, the statement will silently fail that is, it will fail without giving an error.
Now enter your Consumer and Access codes! Save this example as prog1.py and run it with the following command:
python prog1.py
You should see the user details on the terminal, and a tweet from your user:
'Tweepy says : Hello, World!'
In addition to the preceding functionality, we can also use Tweepy to do other things such as reading statuses. Some of the more important functionality is detailed next:
api.home_timeline([since_id], [max_id], [count], [page]): Returns the 20 most recent tweets on the user's timeline.countspecifies the number of tweets to retrieveApi.user_timeline([id/user_id/screen_name], [since_id], [max_id], [count], [page]): Returns the 20 most recent tweets from the specified user or, if none is given, from the authenticating userApi.get_status(id): Returns the status by IDApi.update_with_media(filename, [status], [in_reply_to_status_id], [lat], [long], [source], [place_id], [file]): Updates the authenticated user's status with media
Congratulations! We have successfully set up a Twitter app using Python and communicated with the API. We will now move on to the next example where we learn how to set up a SQLite database to store some data on the Raspberry Pi.
Using Tweepy
Tweepy was built to be easy to set up and use, and in that regard it is of one of the most useable libraries for communicating with the Twitter API. It takes no more than four lines of code to set it up for use. However, before we can use it to communicate with our account on Twitter, we need to set up a developer app on Twitter. For this, we log on to https://apps.twitter.com, sign in to our Twitter account and hit Create New App, after which we will be greeted by a window that allows us to create a new application, as shown in the following window:

Fill in all the required details such as Name, Description, and Website. Remember, if you don't plan on using this app on a website, you can also put in a placeholder instead of an actual website. Finally, sign the developer agreement and you will have successfully created a Twitter app to use with your Python script. From this app, we will need a Consumer Secret (API Secret) and a Consumer Key (API Key) to use the Tweepy library, which is required for obtaining oauth authentication from the Twitter app. Next, we need to create an access code for our app that is required for communication with the Twitter API.

From the preceding page, click the manage keys and access tokens to get to the page where you can get your consumer codes and access tokens. The following menu will give the consumer keys:

And the following screen will show us our application codes and also give an option to generate new access codes for our application:

We can now proceed to learn how to use Tweepy to get a list of followers. The code is given next, and the explanation follows:
import tweepy

auth = tweepy.OAuthHandler(consumer_key, consumer_secret)
auth.set_access_token(access_token, access_token_secret)

api = tweepy.API(auth)

user = api.get_user('twitter')

print user.screen_name
print user.followers_count
for friend in user.friends():
    print friend.screen_name

api.update_status(' Tweepy says : Hello, world!')
In this example, we first import the Tweepy library into Python to use its functionality. We first need to register our Python script (client) to be able to communicate with the Twitter API. For this, we will enter the Consumer Key and the Consumer Secret in the argument of the OAuthHandler method of the Tweepy API. Next, we set the access codes for opening up the Twitter API for our client's use. This is important because we need to have an access token for the app to be able to do things like send tweets, reading tweets, or viewing followers, and so on. Access codes for the Twitter app can be found in its settings, just below the Consumer Codes.
We have so far set the authentication details, but we still need to do the authentication to send tweets. This is accomplished by the API() function in the Tweepy module. We first create an api variable that contains all the methods for interacting with the Twitter API.
The next statement gets the user associated with our unique Consumer Key. Every registered user will have this key and it is unique for every user so they can correctly identify themselves. The get_user() method takes as an argument, the name of the service (Twitter in this case) that we need from the user, and passes the authentication codes that we have got from the previous statement to get the user details. This is stored in the user variable. This variable will have members such as the name, followers, following, and so on.
To check that we really get the correct user from this method, we only need to print the correct members of the user variable. So we first print to the command line, the screen name, and the follower count. The next while loop loops over the friends() method of the user variable and stores each follower detail in the friend variable. Then we print the name of each friend to the command line. This way, we can check if we have our user details correct or not.
Finally, we can send a tweet using the update_status() method of the Tweepy API. This method takes a string as input and sends out a tweet. However, if a string is more than 140 characters in length, the statement will silently fail that is, it will fail without giving an error.
Now enter your Consumer and Access codes! Save this example as prog1.py and run it with the following command:
python prog1.py
You should see the user details on the terminal, and a tweet from your user:
'Tweepy says : Hello, World!'
In addition to the preceding functionality, we can also use Tweepy to do other things such as reading statuses. Some of the more important functionality is detailed next:
api.home_timeline([since_id], [max_id], [count], [page]): Returns the 20 most recent tweets on the user's timeline.countspecifies the number of tweets to retrieveApi.user_timeline([id/user_id/screen_name], [since_id], [max_id], [count], [page]): Returns the 20 most recent tweets from the specified user or, if none is given, from the authenticating userApi.get_status(id): Returns the status by IDApi.update_with_media(filename, [status], [in_reply_to_status_id], [lat], [long], [source], [place_id], [file]): Updates the authenticated user's status with media
Congratulations! We have successfully set up a Twitter app using Python and communicated with the API. We will now move on to the next example where we learn how to set up a SQLite database to store some data on the Raspberry Pi.
Setting up a SQLite database in Python
SQLite (pronounced Sequel Lite) is a lightweight disk-based database that doesn't require a separate server process and uses a modified version of the SQL query language to access the data. The entire database is saved in a single file and can be used for internal data storage. It is also possible to make a prototype of an application using SQLite and then port the code to work with a larger database with minimal modifications. The Python standard library has a module called sqlite3 included, which is intended to work with this database. This module is SQL interface-compliant with DB-API 2.0.
Note
You can find more information and the full API reference for the SQLite3 module on its official website: https://docs.python.org/2/library/sqlite3.html.
Next is an example on how to use the sqlite3 module to create a SQLite database to store and retrieve some data. We will go through the code, statement by statement, and analyze what each statement does and also discuss any variations that might be possible.
import sqlite3

conn = sqlite3.connect('raspi.db')
cursor = conn.cursor()

#Inserting Data
cursor.execute('''
    CREATE TABLE users(id INTEGER PRIMARY KEY, name TEXT,
                   	email TEXT unique, password TEXT)
''')
cursor.execute('''INSERT INTO users(name, email, password)
                           VALUES(?,?,?)''', ('Luke', '[email protected]', 'iamurfather'))

cursor.execute('''INSERT INTO users(name, email, password)
                           VALUES(?,?,?)''', ('Darth Vader', '[email protected]', 'darkside'))

conn.commit()


#Retrieving Data

user_id = 1
cursor.execute('''SELECT name, email, password FROM users WHERE id=?''', (user_id,))
user1 = cursor.fetchone()
print(user1[0])
allusers = cursor.fetchall()
for row in allusers:
    print('{0} : {1}, {2}'.format(row[0], row[1], row[2]))


#Deleting or Updating Data

new_email = '[email protected]'
userid = 2
cursor.execute('''UPDATE users SET email = ? WHERE id = ? ''',
(new_email, userid))

del_userid = 1
cursor.execute('''DELETE FROM users WHERE id = ? ''', (del_userid,))

conn.commit()
conn.close()
We will now study the data exchanges that took place in the database in the preceding given Python script. Since sqlite3 is a default Python module, we don't need to install any additional dependencies. So we import the module into our Python program, and create a new file to save the database with the sqlite.connect() method. This method creates a new file for the database if none exists, and if it does the method connects to it and loads the existing database inside the file. Next, we create a cursor that acts as a pointer to the data inside the database. As such, we can only manipulate the data that the cursor is pointing to. We do this with the cursor() method that operates on the connection variable, which we created in the last statement.
Currently, our file does not have a database, so with the next lines of code we create a database and insert some data in it. The execute() method takes SQL commands as one of the arguments to manipulate data. Hence, to create the database, we execute the CREATE TABLE query. In this case, we create a table named users that will have a minimum of one data column, which is the key number of the data. This ensures that the data has a unique serial ID by which it can be accessed. We save three fields for each user: the name, the e-mail ID, and the password. So this database can be used for logging in to an application where different users can log in. The TEXT type in SQL is the same as str in Python, INTEGER is int, REAL is float. To make sure that no two users enter the same e-mail ID, we add a "unique" marker to the e-mail column. Now that we have created a database, we need to add some data to it. We use the INSERT INTO command to accomplish this. After inserting into vi, mention the name of the database into which we want to insert the data with the names of the arguments. Then the values function will take the actual values of the data. The ? means that the data is given as a value in a tuple. We repeat the same process with different data to add rows to the database. Notice that we didn't need to set the serial ID of the data for it to be saved properly. That is one advantage of having a cursor in the database. It automatically places new data in the next available row in the database. To actually write the data into the database file and save it, we need to commit our changes. This is done by the commit() function that operates on the connection variable. You can visualize the database with a free tool called SQLite Database Browser. This is what the database looks like after we have made the changes just specified:

Now that we have learned how to insert new data into the database, we will see how to read existing data from the database.
First, we need to know the serial-id, name, e-mail, or password of the user that we need to retrieve. Let's assume in this case we want to retrieve the user details by the serial ID. So we execute the SELECT command, which selects a row based on the condition that is given. If no condition is given, it will automatically select the first row in the database. The whole statement is close to plain English, so should be easy to understand. Basically, it selects the columns specified from the database name that is given according to a condition given after WHERE.
So, after the preceding statement our cursor is pointing toward the row whose ID is 1. The fetchone() method fetches the data from the row that the cursor is pointing to, and saves it in the user1 variable as a list. Then, we simply print the first element of the list, which is the user's name in this case. However, if we want to fetch the data from all the rows in the database, we execute the fetchall() method. This points the cursor at all the rows in the database starting from the first one, and saves the result in the allusers variable. Then, we simply print the data in a for loop.
We have now learned how to save and retrieve data from the database. But what if we want to update user details or delete data? The next block of code (in the preceding code snippet) teaches us exactly that.
Assume that we want to update the e-mail ID of the second user in the database. We first set the new e-mail ID in a string variable, and then the user that we want to select in an integer variable. Then, to update the data, we use the UPDATE SQL query. It takes two or more arguments in addition to the database that we want to update: the data that we want to update and a condition, in this case the serial ID of the row. Both of which we give by using the ? technique we described earlier. The condition operator WHERE operates in exactly the same way in UPDATE as it does in SELECT, pointing the cursor according to the condition given. After the update, this is what our table looks like:

To delete some data, we use the DELETE query and select the database with the FROM query. We also employ the condition by using the WHERE query and giving it the serial ID we want to delete.
Since we have changed the data in the database, to write the changes into the file we use the commit() method, and finally release the file from the Python script with the close() method. This ensures that no new changes can be made to the file unless it is connected again. If we close the file without committing the changes, no changes will be reflected in the database and we will have lost any changes that we previously made. This is what the table looks like after we delete the first row:

Finally, we have learned how to save and update data into a database, and retrieve it on demand for our use. We also know, from our previous Twitter tutorial, how to send updates to Twitter. So for our next project, we will build a tweeting weather station that will also save the data into a database. Sounds interesting? Let's get into it.
Building a tweeting weather station
This is a continuation of the project that we built in the previous chapter and that used the temperature and humidity Grove sensor with the Raspberry Pi to display the weather conditions. We will be using the same hardware.
The only difference now is that instead of displaying the weather on the terminal, we will be live-tweeting it, and also saving the information into a database for later retrieval.
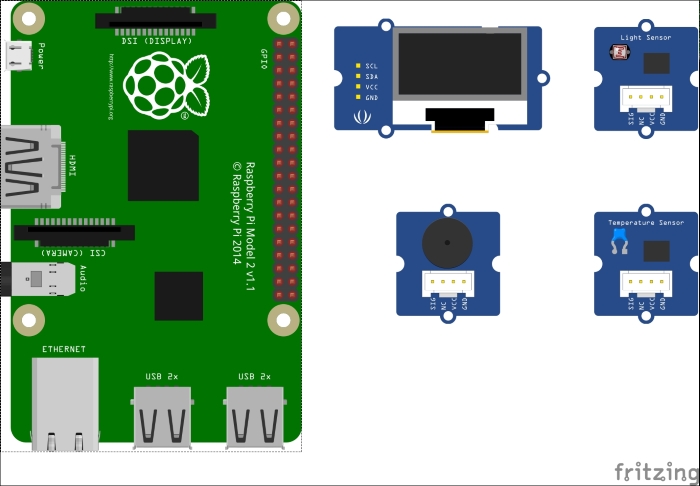
To revisit the project, we should go through it once again by turning to Chapter 9, Grove Sensors and the Raspberry Pi. Much of the code that was used previously will be used again, with the addition of the blocks where we tweet the information and save it in a database. For this project, it is recommended that you make a new Twitter account and create a new app on it to get the Consumer and Access codes.
The full Python script is presented next. We know what most of the code does because of the previous projects that we have built, including the weather station, Twitter bot, and SQLite database, but there is a brief summary at the end of the code.
from grovepi import *
from grove_oled import *
import tweepy
import sqlite3
import datetime

dht_sensor_port = 7

oled_init()
oled_clearDisplay()
oled_setNormalDisplay()
oled_setVerticalMode()
time.sleep(.1)

auth = tweepy.OAuthHandler(consumer_key, consumer_secret)
auth.set_access_token(access_token, access_token_secret)
api = tweepy.API(auth)

conn = sqlite3.connect('raspi_weather.db')
cursor = conn.cursor()

cursor.execute('''
    CREATE TABLE weather(id INTEGER PRIMARY KEY, time TEXT,
                   	temp INTEGER, hum INTEGER)
''')


while True:
       try:
        [ temp,hum ] = dht(dht_sensor_port,1)
        print "temp =", temp, "C\thumidity =", hum,"%"
        t = str(temp)
        h = str(hum)
                time = str(datetime.datetime.time(datetime.datetime.now()))

        oled_setTextXY(0,1)
        oled_putString("WEATHER")

        oled_setTextXY(2,0)
        oled_putString("Temp:")
        oled_putString(t+'C')

        oled_setTextXY(3,0)
        oled_putString("Hum :")
        oled_putString(h+"%")
                api.update_status("Temperature : " + t + " C, " + "Humidity : " + h + "% ")
                cursor.execute('''INSERT INTO weather(time, temp, hum)
                                  VALUES(?,?,?)''', (time, t, h))

        except (IOError,TypeError) as e:
        print "Error"
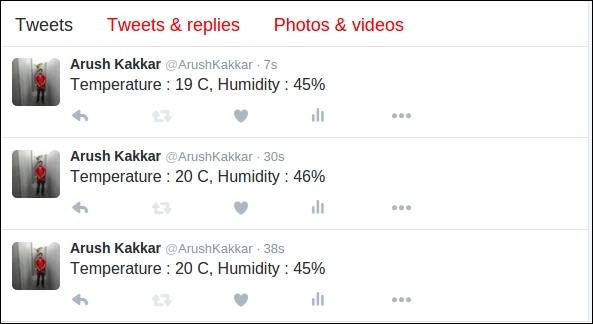
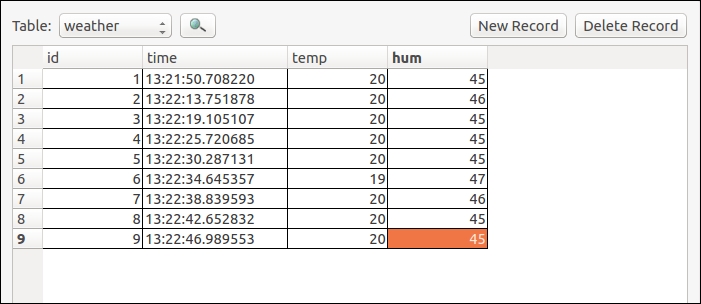
As is evident from the preceding code, it is an updated version of the weather station we built in the previous chapter. We add the consumer and access codes for our Twitter application so that we can tweet the weather information directly from this script. We import the Tweepy library and set up the access. We also import the sqlite3 module and create a new database called weather, which has three data columns: time, temperature, and humidity, in addition to the serial number column. Finally, in addition to displaying the temperature and humidity on the OLED screen, we also update it in our tweet and save it in the database we just created along with the time information. The time information is given by the datetime module that is included with the default Python installation. datetime.datetime.now() gives the current date and time. datetime.datetime.time() gives the current time provided we are only given datetime.datetime.now() as an argument.
The tweets from our script will look like this:
And if we browse the database that we just created, it looks something like this:
We have now built a weather station that not only monitors and saves weather information for you but also broadcasts it to the world! An interesting extension to this would be to add speech capabilities so that the Raspberry Pi speaks out the weather information via a speaker. The espeak library is an easy-to-use library that accomplishes this easily and effectively. Moreover, you can also hook up to a weather service that has a web API and get your Pi to speak out weather forecasts too!
Adding speech capabilities to our weather station
Speech is one of the many ways in which humans communicate. And it's fascinating to make machines do the things that humans do effortlessly. For precisely that reason, we will add speech capabilities to our tweeting weather station so that it can speak out the weather, and we no longer have to stare at our OLED screen or scroll our Twitter feed to learn about the weather. For this task, we will be using an open source tool called espeak, which is a text-to-speech engine and also has an API for Python.
First, install the espeak library with the following commands:
sudo apt-get install espeak
sudo apt-get install python-espeak
The good thing about this library is that we can use it from the terminal or from the Python console. To try it out, make sure that you have a speaker connected to the Pi and execute the following command from the Linux terminal:
espeak I will tell you the weather'
This will produce the speech output and we will be able to hear it from the speaker. Cool, right?
Next, we will learn how to use it with Python and then also add it to our weather station project. Open a Python console by typing python in a Linux terminal. To import the dependencies, execute the following statement:
>>> from espeak import espeak
This imports the dependencies required for the speech output. Using espeak from Python is also as easy as:
>>> espeak.synth("I am the weatherman")
The synth method in the espeak module accepts a string and produces speech based on that. It's not the best-sounding voice, but it works!
To add this to the weather station, we can add the following statement inside our while loop:
espeak.synth("The current temperature is : " + str(temp))
espeak.synth("Humidity level is : " + str(hum) + "percent")
This works because Python supports string concatenation. This means that we can combine two strings just by adding a + sign between them. However, the temp and hum variables are not string variables. So we need to convert them to strings by the str() method. The Str() method takes any type of variable and converts it into a string.
We can also use the espeak library to tell us many different things about our environment by getting the state from the Grove Sensors.
Summary
In this chapter, we learned how to use Python to communicate with Twitter by using an open source library, Tweepy. We learned how to use Tweepy to send tweets. We also learned how to create a database, save and update data in it, and get some data from an existing database. Toward the end, we extended the capabilities of the weather station we built in Chapter 9, Grove Sensors and the Raspberry Pi and added tweeting and data-saving functionalities to it. We also added speech capabilities to it to make it easier to use.
In the next chapter, we will be exploring the interesting topic of parallel computing. We will be using multiple Raspberry Pis to create a cluster of computers that perform computations faster by working in tandem towards a single task. A master Pi will control other slave Pis and outsource its computations to them, so that the task is performed faster. We will use this setup to perform an n-body simulation, which is by itself a very computationally challenging task.


