Creating simple movement with keyframes
In the first act, our hero Cube will stride fearlessly from west to east. We’ll achieve this using keyframes, a technique inherited from the traditional hand-drawn animation process.
In hand-drawn animation, a lead animator draws the most important frames in a shot, or “keyframes,” which determine the positions and expressions of characters and objects in the shot at key points in time. These keyframes are then passed to the “in-betweener,” who draws the rest of the frames in between to create a smooth appearance of movement.
In Blender and other animation apps, keyframes play a similar, though much simpler role: determining what the value of a property will be at a given frame. It’s easier to see for yourself than read about it, so let’s jump right in!
Keying the initial location
To begin, we’ll give our main character, Cube, a suitable starting position:
- Go to frame
10. - Select the
Cube. - Move the
Cubeup1unit on the Z axis so that it rests on the “floor” in the 3D Viewport. - Move the
Cube-5units leftward on the X axis. - Now, let’s insert our first keyframe! With the
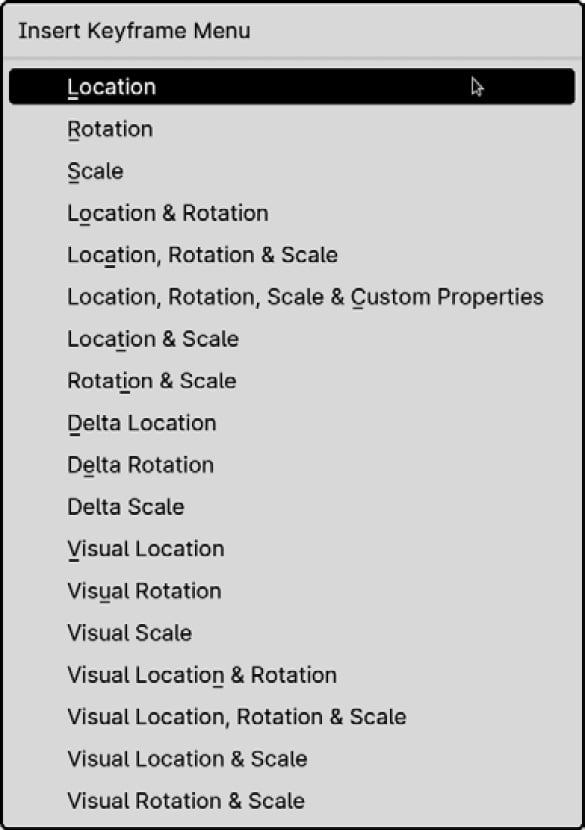
Cubestill selected and your mouse cursor in the 3D Viewport, press the I key.This brings up the Insert Keyframe menu, one of several ways to insert a location keyframe:

Figure 1.7: The Insert Keyframe menu
What you see here is a list of some (but not all) of the selected object’s properties that can be keyed. Click Location to insert a location keyframe.
Important note
From this point onward, always be aware of what you have selected and what frame you are on, especially when inserting keyframes.
The keyed property
We have just inserted a keyframe for the location of the Cube on frame 10. This is huge! In the future, we will insert and edit dozens of these things at once, but for the moment, let’s dwell on what has changed.
Firstly, a small diamond shape has appeared in the Timeline. If you don’t see it at first, scroll up or press Home; it might be hiding:

Figure 1.8: New keyframe on frame 10
That’s our keyframe, insofar as it exists in the Timeline. Its horizontal position marks the frame on which you have “keyed” a property of the Cube. Although you can’t see it yet in the Timeline, it also contains the X, Y, and Z values of the cube’s Location property when it was keyed.
Tip
By default, the Timeline only displays the keyframes of selected objects; they will hide when you select a different object. In later chapters, we’ll examine other editors better suited for displaying the keyframes of multiple objects at once.
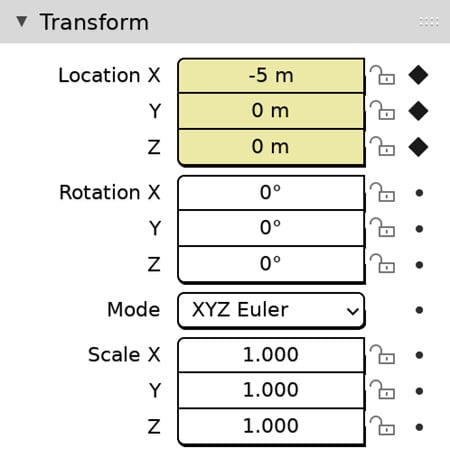
Secondly, take a look at the cube’s Transform properties:

Figure 1.9: The keyed Location property
The Location values are now highlighted and distinguished by a small set of keyframe-shaped icons to the right. This indicates that they are “keyed.”
Tip
Animated properties are highlighted yellow when there is a keyframe for that property on the current frame, green on every other frame, and orange when manually changed.
Try moving the Cube again, and then change frames. The Cube will immediately “snap” back to its keyed location. The property has been “taken over” by its keyframes. From now on, any manual change you make to the cube’s location can only be temporary unless you insert another keyframe for it.
Important note
A single property cannot have two keyframes on the same frame. If you insert a keyframe where one already exists, the new keyframe will simply replace the old one.
Keying the second location
Play the animation and look closely at what happens to the Cube. Nothing! Now, play the animation backward. What happens then? Again, nothing – but now it’s happening backward.
Our one keyframe simply determines that the Cube must be at a certain location on frame 10, but one keyframe isn’t enough to create movement. Until we add a second location keyframe, our Cube will remain at just one location – not only on frame 10 but on every other frame as well.
Let’s add that second keyframe:
- Go to frame
40. - Move the
Cube10units rightward on the X axis. - Press I and insert another Location keyframe:

Figure 1.10: The Cube on frames 10 and 40
Now, play the animation. The Cube moves! Two keyframes were all we needed to create motion. Now let’s take a closer look at what happens between those two keyframes.
Principles of keying
Note that we never issued any “commands” to the Cube in order to make it move. We did not, for instance, encode any events like “begin moving at frame 10,” or “stop moving after frame 40.” This is a misapprehension that novice animators often have. By inserting these keyframes, we simply declared that on frame 10, the Cube shall be in one specific place, and on frame 40, it shall be in another.
Also, watch what happens to the X Location value of the Cube as you change frames:

Figure 1.11: The Location property on frame 20
Although we might say we have “animated the Cube”, it is more accurate to say that we have animated just one property of the Cube (Location), and even then, only one of the three components of that property actually changes (the X Location). For now, everything else about the Cube (for example, its Rotation and Scale) remains unaffected.
Finally, note that we didn’t need to interfere in the 29 other frames between frame 10 and frame 40 in order to make the Cube move smoothly from one place to another. Blender handled that automatically, playing the role of in-betweener for us. This is arguably the greatest advantage that digital animation offers over traditional animation.
Tip
The method by which one value transitions to another is called interpolation. We’ll explore some different interpolation modes in the next chapter.
Keying rotation
In the second act of our epic 120-frame animation, the Cube gets homesick and turns around, in preparation for the long journey back to its birthplace. We’ll animate this part by keying not the Location property but the Rotation property.
As you might expect, we can follow the same process as before, using the Insert Keyframe (I) menu. Since you’ve already had some practice, we can cover this part more quickly:
- Go to frame
45. - Ensure the
Cubeis still selected. - Press I to bring up the Insert Keyframe menu and click Rotation.
- Go to frame
55. - Rotate the
Cube180degrees on the Z axis (clockwise or counterclockwise – your choice). - Repeat step 3 to insert the second rotation keyframe.
There should now appear to be four keyframes in the Timeline: two for the cube’s location and two for its rotation. For the moment, we cannot tell just from looking at the Timeline which are which but rest assured that they are distinct. We will learn how to look at their contents more closely in the next chapter.
When you playback your animation now, the Cube will move from west to east, wait 5 frames, then briskly spin around for 10 frames to face the opposite direction.


