Search icon CANCEL
Subscription
0
Cart icon
Your Cart (0 item)
Close icon
You have no products in your basket yet
Arrow left icon
Explore Products
Best Sellers
New Releases
Books
Videos
Audiobooks
Learning Hub
Free Learning
Arrow right icon
Arrow up icon
GO TO TOP
Business Intelligence with Looker Cookbook

You're reading from   Business Intelligence with Looker Cookbook Create BI solutions and data applications to explore and share insights in real time

Arrow left icon
Product type Paperback
Published in May 2024
Publisher Packt
ISBN-13 9781800560956
Length 256 pages
Edition 1st Edition
Tools
Arrow right icon
Author (1):
Arrow left icon
Khrystyna Grynko Khrystyna Grynko
Author Profile Icon Khrystyna Grynko
Khrystyna Grynko
Arrow right icon
View More author details
Toc

Table of Contents (13) Chapters Close

Preface 1. Chapter 1: Getting Started with Looker FREE CHAPTER 2. Chapter 2: Configuring Views and Models in a LookML Project 3. Chapter 3: Working with Data in Explores 4. Chapter 4: Customizing and Serving Dashboards 5. Chapter 5: Making Dashboards Interactive through Dynamic Elements 6. Chapter 6: Troubleshooting Looker 7. Chapter 7: Integrating Looker with Other Applications 8. Chapter 8: Organizing the Looker Environment 9. Chapter 9: Administering and Monitoring Looker 10. Chapter 10: Preparing to Develop Looker Applications 11. Index 12. Other Books You May Enjoy

Providing access to your team

When you create your first Looker instance, you become its owner and administrator. You can then provide access to the rest of your team. Remember, by default, with the Standard edition, Looker gives you 12 free user allocations with the Standard version – 2 developers and 10 standard users. The Standard edition is tailored for small teams with up to 50 internal platform users.

For your free trial space, it is best to add only the colleagues who will actively participate in testing Looker with you.

How to do it...

To add your colleagues to your Looker free trial instance you will need to do the following:

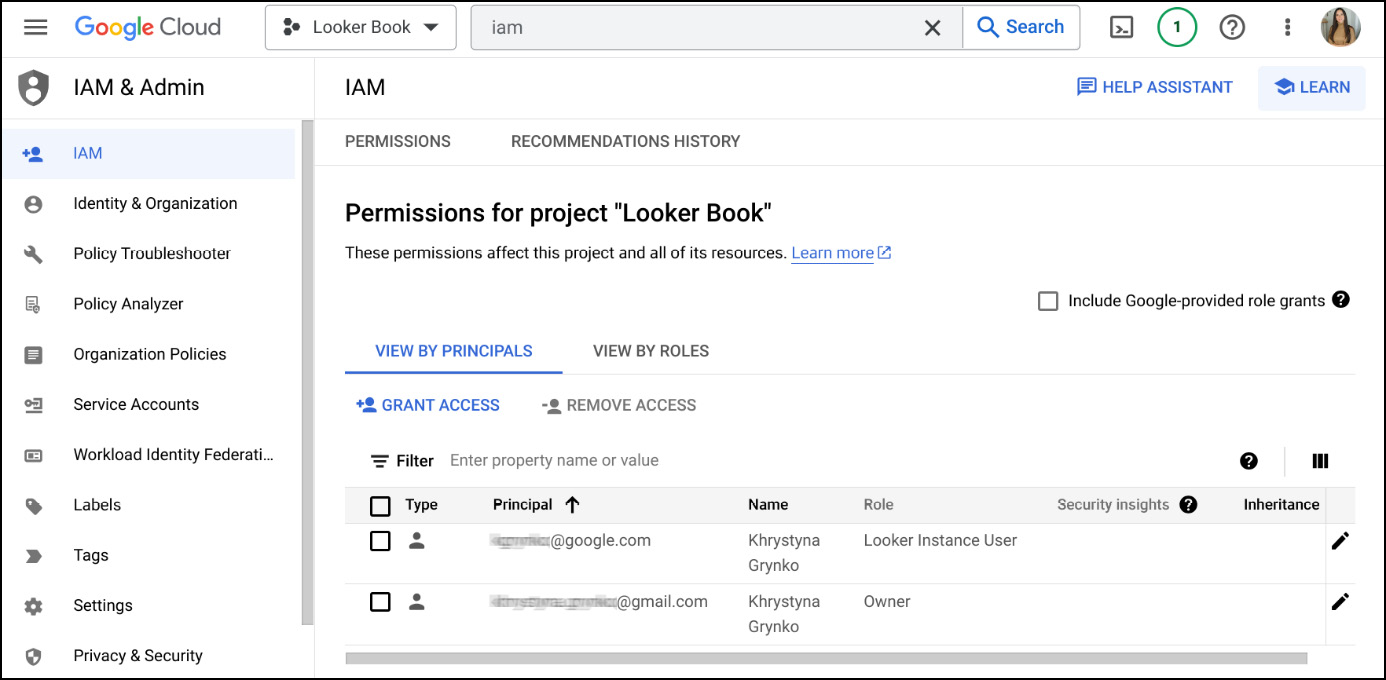
  1. In the GC console, go to the IAM & Admin section.
  2. Click on the IAM tab.
  3. Click on GRANT ACCESS (Figure 1.10).
Figure 1.10 – Cloud IAM

Figure 1.10 – Cloud IAM

  1. In New principals, add an email (should be a Google account) or multiple emails of your co-testers.
  2. In Select a role, type Looker to filter, then assign your colleagues the same Looker role you have (for example, Looker Admin) to ensure they have the same level of access as you during the trial.
  3. Send the Looker instance URL to the person that you provided access to (to find your instance URL, see Figure 1.8).
  4. When they click on the link or copy and paste it into the browser, they will be asked to authenticate with their Google account.
  5. Once authenticated, your colleagues will see the same Looker Welcome page you saw when first connected to Looker.

Important note

When managing user permissions in Looker, it’s important to grant access based on specific needs. While collaboration is key, admin access should be reserved cautiously. For most colleagues, assigning “Looker instance user” status is sufficient.

See also

  • Other (more advanced) user roles and connection options will be discussed later in this book: Chapter 9, Administering and Monitoring Looker.
You have been reading a chapter from
Business Intelligence with Looker Cookbook
Published in: May 2024
Publisher: Packt
ISBN-13: 9781800560956
Register for a free Packt account to unlock a world of extra content!
A free Packt account unlocks extra newsletters, articles, discounted offers, and much more. Start advancing your knowledge today.
Unlock this book and the full library FREE for 7 days
Get unlimited access to 7000+ expert-authored eBooks and videos courses covering every tech area you can think of
Renews at $19.99/month. Cancel anytime
Banner background image