Creating Azure AD users and groups
Azure AD offers a directory and identity management solution within the cloud. It offers traditional username and password identity management, alongside roles and permissions management. On top of that, it offers more enterprise-grade solutions, such as Multi-Factor Authentication (MFA) and application monitoring, solution monitoring, and alerting.
Azure AD can easily be integrated with your on-premises Active Directory to create a hybrid infrastructure.
Azure AD offers the following pricing plans:
- Free: This offers the most basic features, such as support for single sign-on (SSO) across Azure, Microsoft 365, and other popular SaaS applications, Azure Business-to-Business (B2B) for external users, support for Azure AD Connect synchronization, self-service password change, user and group management, and standard security reports.
- Office 365 Apps: Specific Office 365 subscriptions also provide some functionality such as user and group management, cloud authentication, including pass-through authentication, password hash synchronization, seamless SSO, and more.
- Premium P1: This offers advanced reporting, MFA, Conditional Access, Mobile Device Management (MDM) auto-enrollment, Azure AD Connect Health, advanced administration such as dynamic groups, self-service group management, and Microsoft Identity Manager.
- Premium P2: In addition to the Free and Premium P1 features, the Premium P2 license includes Azure AD Identity Protection, Privileged Identity Management, access reviews, and entitlement management.
Note
For a detailed overview of the different Azure AD licenses and all the features that are offered in each plan, you can refer to https://www.microsoft.com/nl-nl/security/business/identity-access-management/azure-ad-pricing?rtc=1&market=nl.
Creating users in Azure AD
We will begin by creating a couple of users in our Azure AD tenant from the Azure portal. To do this, perform the following steps:
- Navigate to the Azure portal by opening a web browser and browsing to https://portal.azure.com.
- In the left-hand menu, select Azure Active Directory.
- Under the Manage blade of Azure AD in the left-hand menu, select Users | All users. Then, select the + New user option from the top-level menu, as follows:

Figure 1.1 – The Azure AD Users blade
- We are going to create three users. Add these values that are shown in the following screenshot:
- Name:
PacktUser1. - User name: The username is the identifier that the user enters to sign in to Azure AD. Select your domain name, which has been configured, and add this to the end of the username. The default is usually an onmicrosoft.com domain, but in my case, I have assigned a custom domain name, called safezone.fun. In the First name section, I have chosen
Packt, and in the Last name section, I have addedUser1. Therefore, the User name value, in my case, will be[email protected]:
- Name:
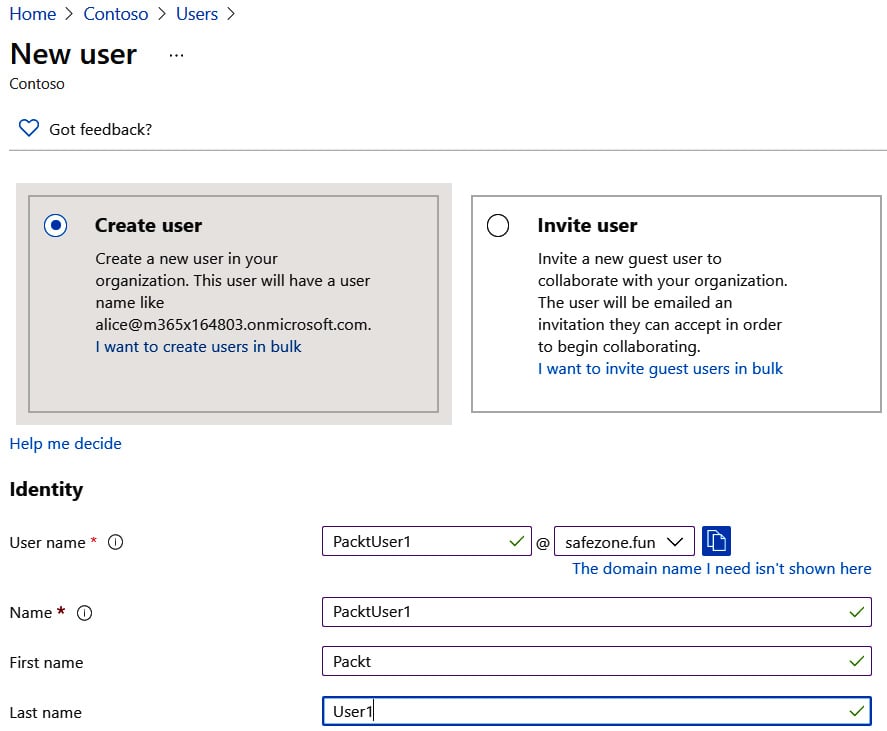
Figure 1.2 – The Azure AD user creation page part 1
- Leave the sections under Groups and Roles in their default settings for now.
- Next, we need to fill in information regarding the following:
- Block sign in: No
- Usage location: South Africa
- Job title:
Azure administrator - Department:
IT - Company name:
Packt1 - Manager: No manager selected:
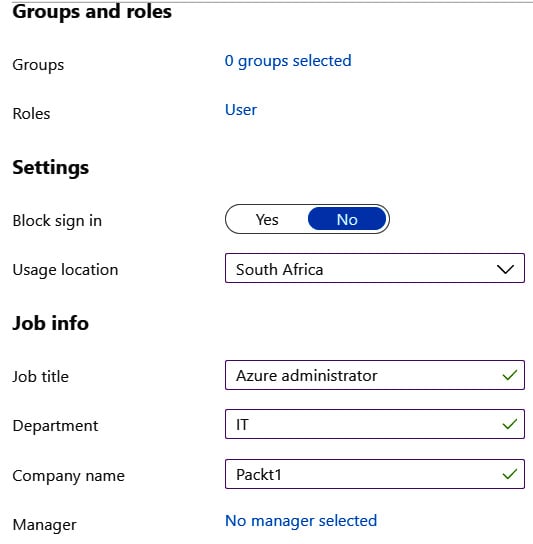
Figure 1.3 – The Azure AD user creation page part 2
- Click on Create.
- Repeat these steps to create two more users: PacktUser2 and PacktUser3.
Now that we have created users in our Azure AD tenant, we can add them to a group in Azure AD.
Creating groups in Azure AD
There are two main group types, as follows:
- Security groups: These groups serve the same function as traditional on-premises groups, which is to secure objects within a directory. In this case, it is to secure objects within Azure AD.
- Microsoft 365 groups: These groups are used to provide a group of people access to a collection of shared resources that is not just limited to Azure AD but also includes shared mailboxes, calendars, SharePoint libraries, and other Microsoft 365-related services.
Security groups are used as container units to group users or devices together. There are three main membership types for security groups:
- Assigned: This is where you manually assign users to a group.
- Dynamic user: This is where you can specify parameters to automatically group users, for example, grouping all users who have the same job title.
- Dynamic device: This is where you can specify parameters to automatically group devices, for example, grouping all devices that have the same operating system version.
To create and manage groups from the Azure AD tenant in the Azure portal, you have to perform the following steps:
- Navigate to the Azure portal by opening a web browser and browsing to https://portal.azure.com.
- In the left-hand menu, select Azure Active Directory.
- Under the Manage blade of Azure AD in the left-hand menu, select Groups | All groups. Then, select the + New group option from the top-level menu, as follows:
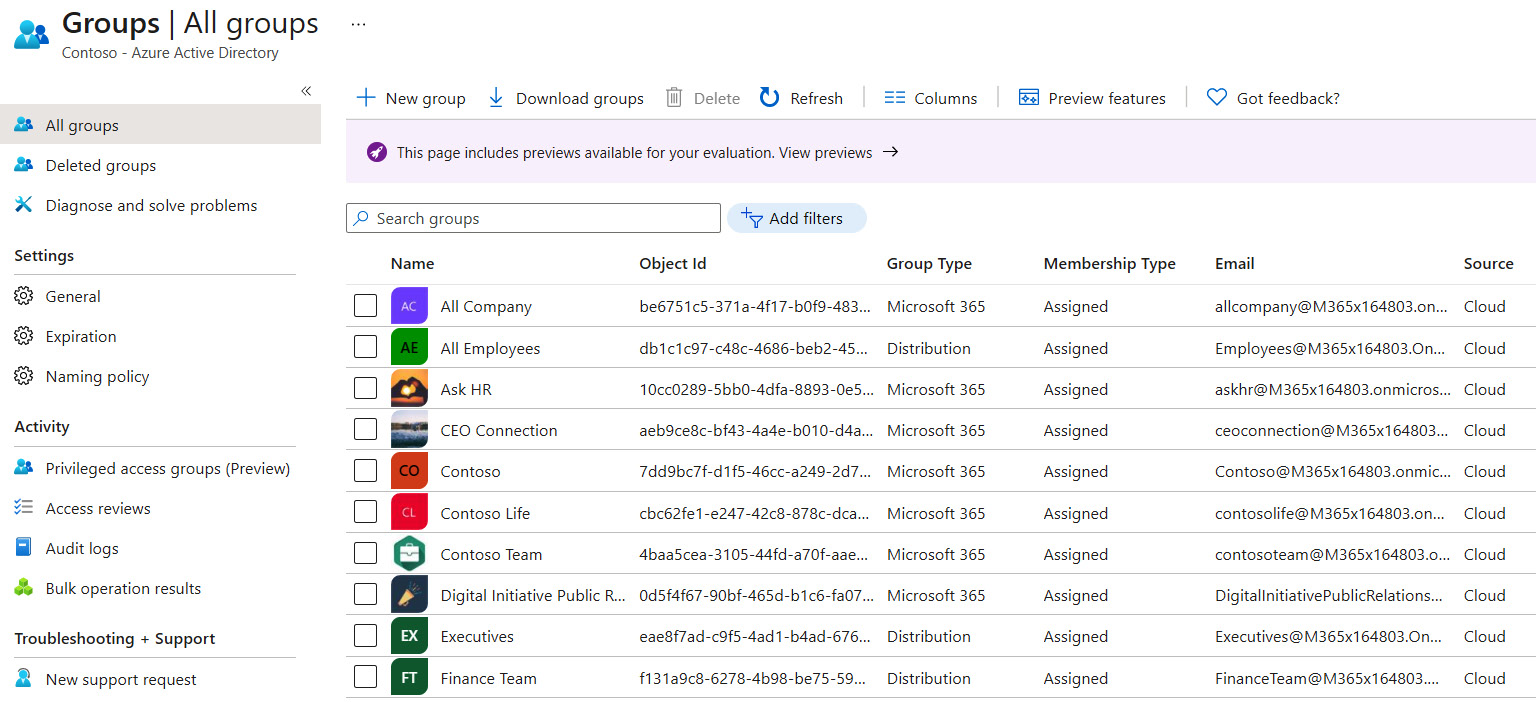
Figure 1.4 – The Azure AD group creation page part 1
- Add the following values to create the new group:
- Group type: Security
- Group name:
Azure Admins - Group description:
Dynamic group for all Azure Admins - Azure AD roles can be assigned to the group: No
- Membership type: Dynamic User
- Owners: No owners selected:
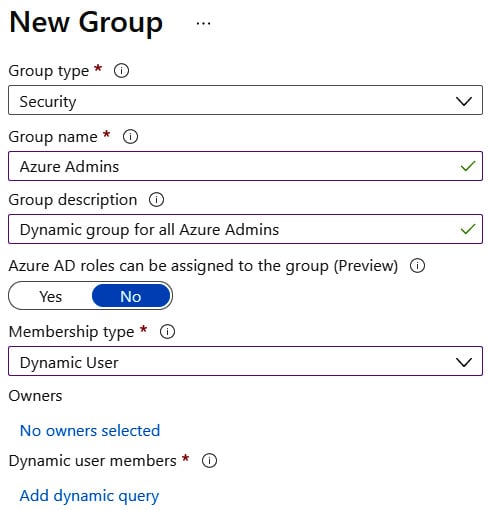
Figure 1.5 – The Azure AD group creation page part 2
- Refer to the following screenshot to add a dynamic query.
For the Dynamic Query rule, the property is jobTitle, the operator is Equals, and the value is Azure administrator, as shown in the following screenshot:
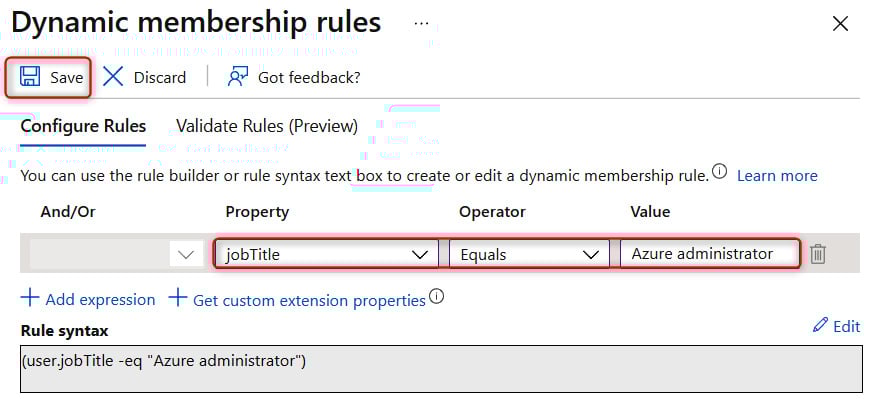
Figure 1.6 – The Azure AD group dynamic query
- Click on Create.
Tip
Remember that when using dynamic groups, a Premium P1 license needs to be assigned to the user.
Now that we have created the group, replication takes around 5 minutes. Refresh the Azure web page, and the users will appear as members of the Azure admins group that we just created:

Figure 1.7 – The Azure AD group's dynamic group users added automatically based on the membership rules
In this section, we took a look at Azure AD users and groups and created a few accounts. We also created a dynamic membership group to include users via dynamic membership rules.
We encourage students to read up further by using the following links, which are based on Azure AD fundamentals such as adding users in Azure AD, assigning RBAC roles, creating Azure AD groups, and also creating dynamic groups in Azure AD:
- https://docs.microsoft.com/en-us/azure/active-directory/fundamentals/add-users-azure-active-directory
- https://docs.microsoft.com/en-us/azure/active-directory/fundamentals/add-custom-domain
- https://docs.microsoft.com/en-us/azure/active-directory/fundamentals/active-directory-users-profile-azure-portal
- https://docs.microsoft.com/en-us/azure/active-directory/fundamentals/active-directory-users-assign-role-azure-portal
- https://docs.microsoft.com/en-us/azure/active-directory/enterprise-users/groups-create-rule
- https://docs.microsoft.com/en-us/azure/active-directory/enterprise-users/groups-dynamic-membership
Next, we are going to look at Azure AUs, specifically where they can be used and how to create an AU.


