Each developer has their own development VM, hosted either in Azure or locally. This is by design and is part of the application lifecycle process. Each developer would get the latest code from source control, and then check in their changes according their organization's development methodology. As part of this check in they can link the check-ins. This allows a build to then be created, and we gain a level of traceability since each work item (user story, feature, bug, and so on.) is linked to the check-ins in that build. This also allows test projects to be automatically executed when the build is generated.
Connecting Visual Studio to Visual Studio Team Services
Getting ready
Once the virtual machine has started, ensure that it has Internet access, and that you have used the admin user provisioning tool to associate your O365 account with the administrator account of Operations.
Before you start this, especially when working in a team, we must rename the VM to make it unique across our team; see the There's more... section for details on this.
How to do it...
To connect Visual Studio to VSTS, follow these steps:
- Create a folder for your projects, and underneath a subfolder with your initials, or others that make the folder unique, within your team; in my example, I chose C:ProjectsTFS.
- Start Visual Studio.
- You will be presented with the licensing page. Use the page to log in to the account used to create the project within VSTS. Which could be either your Microsoft account, or Work (O365) account.
- On the top toolbar, select Team and then Manage connections.
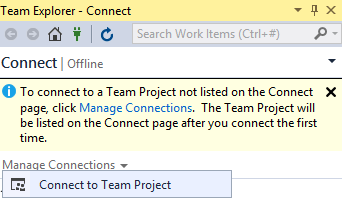
- The Team Explorer will open, under default layout, on the right-hand side. On this pane, select Manage Connections | Connect to Team Project:

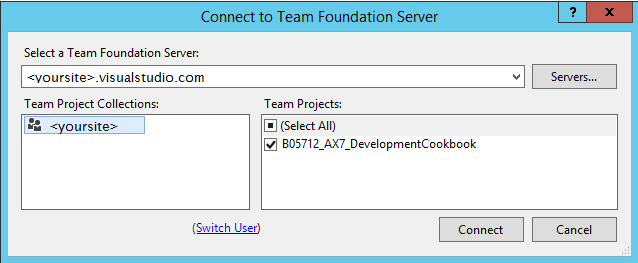
- This will open the Connect to Team Foundation Server dialog, in the Select a Team Foundation Server drop-down list and select your VSTS site.
- Select your project in the lower portion of the dialog, as shown in the following screenshot:

- After pressingConnect, Visual Studio is connected to your project.
- We have one final step before we continue; we have to configure our workspace so Visual Studio knows which folders are under source control and how they map to VSTS. On Team Explorer, click on Configure workspace under the Project section. This will show the Configure Workspace section at the top of the Team Explorer.
- Do not press Map & Get.
- Press Advanced....
- The Edit Workspace dialog will look similar to the following screenshot:

For Operations development, we will need to map a projects folder and the Operations local packages folder (the application source code, or metadata as it is often referred to) to two different folders in VSTS. The Projects folder is the one we created earlier, which was C:ProjectsSB in my case. The Operations local packages folder is C:AOSServicePackagesLocalDirectory.
- In my case, the project is B05712_AX7_DevelopmentCookbook, so I will configure the dialog as shown in the following screenshot:

- Press OK.
- You will then be told that the workspace has been modified, and if you want to get the latest code. Either option has no effect if we are the first developer, but it is a good habit to always press Yes.
How it works...
Source control in Operations has come a long way in this release, mainly because our development tool is now Visual Studio and that the source files are now actual files in the file system. Operations no longer needs special code to integrate with a Team Foundation Server.
The reason we have two folders is that our projects don't actually contain the files we create when writing code. When we create a file, such as a new class, it is created within the local packages folder and referenced with in the project. This also means that we can't just zip up a project and e-mail it to a co-worker. This is done by connecting to the same VSTS project or using a project export feature.
There's more...
When working with multiple developers, one often overlooked task is to rename the virtual machine. This has gotten easier with each update, and the steps we take at the current release are as follows:
- Use Computer management to rename the machine. Use something like project ID and your initials for this; for example, B05712SB.
- Restart the virtual machine.
- Use the SQL Server Reporting Services configuration utility so that it references the correct server name.
See also
- Renaming a VM (https://ax.help.dynamics.com/en/wiki/visual-studio-online-vso-machine-renaming/)
- Configuring your VSTS mapping after a code upgrade (https://ax.help.dynamics.com/en/wiki/configuring-your-vso-solution/)


