Effectively manage your test results
A variety of tools will be used during the process of performing a penetration test. Almost all of these will have output that you will want to keep. One major challenge is to be able to combine all of this data in one place so that it may easily be used to enhance testing efforts by providing you with a holistic view of your data, and shorten the report generation phase.
Introduction to MagicTree
MagicTree, a Java application created by Gremwell, is an actively supported data collection and reporting tool. It manages your data using nodes in a tree-structure. This hierarchical storage method is particularly efficient at managing host and network data. The true power of MagicTree is unleashed when attempting to analyze data. For instance, a search for all IIS web servers found during a scan of a large network would take mere moments.
In addition to providing an excellent data collection mechanism, MagicTree also enables you to create actionable reports based on priorities of your choosing. Reports generated with MagicTree are completely customizable, and easily tailored to meet your reporting requirements. You can even use it to export your data into OpenOffice!
MagicTree allows for XML data imports and has XSLT transforms for many popular formats such as:
Nessus (v1 and v2)
Nikto
Nmap
Burp
Qualys
Imperva Scuba
OpenVas
Note that the developers of MagicTree are pentesters by trade. When exploring MagicTree, it becomes obvious that they understand the challenges that testers face on a daily basis. One example of this is the functionality they made available that allows you to create your own XSLT transforms for the tool. If the XML data you need cannot be imported using the provided transforms, you can make your own!
Starting MagicTree
As with most tools we will be using throughout this book, this one comes preinstalled on BackTrack 5 R1.
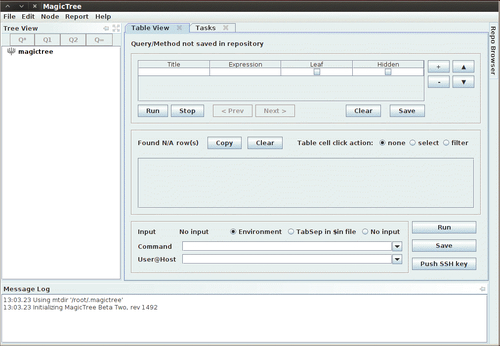
To launch MagicTree from BackTrack we select Applications | BackTrack | Reporting Tools | Evidence Management | magictree. After the splash screen and license agreement has been displayed (the license will need to be accepted) you will be presented with the main application workspace.

Adding nodes
To add a node, press Ctrl+N and type 127.0.0.1 into the Input pop-up box. This will populate the tree with two additional nodes. One for testdata and one for host 127.0.0.1.
There are several node types available when storing your data. To be able to use the tool effectively you will need to familiarize yourself with the various node types:
Branch nodes: Used to create the structure of your tree, make sure not to include spaces when using this node type.
Simple nodes: Most common node type, will be used to store simple data such as an IP address or fully qualified domain name.
Text nodes: Stores text data within the node and could be used to provide information about your testing, or data that you would like to appear in your reports.
Data nodes: Store non-image and non-XML attachments in the project file folder.
XML data nodes: Stores XML data.
Image nodes: Can store images such as screenshots or other important evidence.
Cross-references: Creates a link between nodes to avoid duplication of information.
Overview nodes: Used to enter testing results and recommended mitigation strategies. Can be linked to affected hosts.
Special nodes: Created automatically and used by the application to perform certain tasks. Are not user created.
Note
MagicTree will merge the data from disparate data sources into single nodes in attempt to avoid data duplication—running multiple scanning tools against 127.0.0.1 will not result in multiple nodes representing the same data.
Data collection
Let's collect some data about 127.0.0.1. In addition to being able to select scan results from tools you have run outside of MagicTree, you can also scan directly from within the tool and use variables to select your target ranges or hosts.
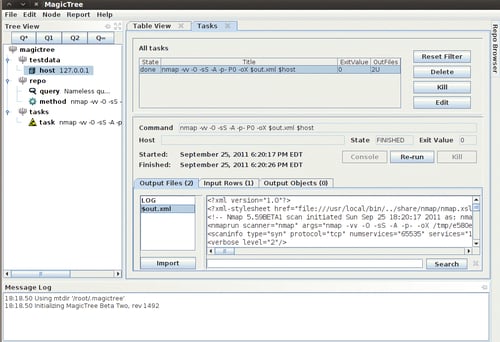
Select the host 127.0.0.1 node in the Tree View menu, click on the Q* button which represents Query All and type the following into the Command text field (which must be clicked in to make it active):
# nmap -vv -O -sS -A -p- P0 -oX $out.xml $host
This will initiate an Nmap scan against 127.0.0.1 and place the results in an XML file named $out.xml.

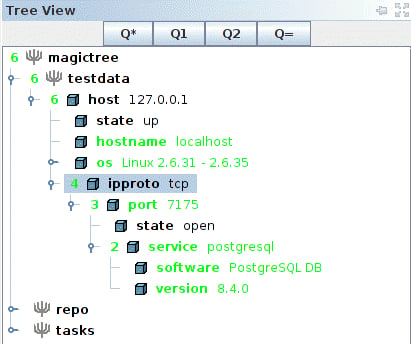
We will select $out.xml and click on the Import button to have MagicTree automatically generate our node structure based on the scan results.

MagicTree has imported the Nmap results and merged them with our host. Looks like we have postgresql version 8.4.0 running on our BackTrack virtual machine on port 7175!
Report generation
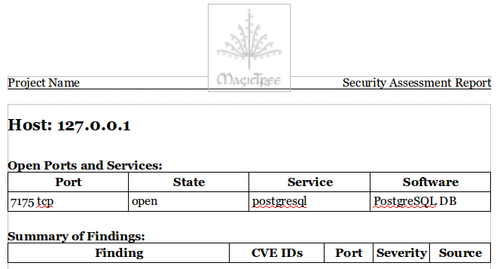
Now that we have some results, we will look at how simple report generation can be. The installation that comes preinstalled with BackTrack 5 R1 has five report templates for OpenOffice preconfigured that can be used as a reference for creating your own templates or just as they are.
At the top from the menu bar, select the Report option followed by Generate Report. This will initiate the Generate Report template selection screen. Select open-ports-and-summary-of-findings-by-host.odt by using the browse option and then click on Generate Report. After a few moments, OpenOffice will open up the automatically generated report listing all open ports by host along with any findings you may have had.

This has just been a quick introduction to the MagicTree project. This tool is immensely powerful and it will take you a bit of practice before its true potential has been unlocked. The documentation provided with MagicTree is well written and frequently updated. If you are primarily performing your penetration testing in very small teams, or in teams of one, then MagicTree will probably be the only data collection tool you will ever want.


