Search icon CANCEL
Subscription
0
Cart icon
Your Cart (0 item)
Close icon
You have no products in your basket yet
Arrow left icon
Explore Products
Best Sellers
New Releases
Books
Videos
Audiobooks
Learning Hub
Free Learning
Arrow right icon
Arrow up icon
GO TO TOP
Beginning C# 7 Hands-On ?????? The Core Language

You're reading from   Beginning C# 7 Hands-On ?????? The Core Language Learn the C# language by coding it element by element

Arrow left icon
Product type Paperback
Published in Aug 2017
Publisher
ISBN-13 9781788296540
Length 566 pages
Edition 1st Edition
Languages
Arrow right icon
Author (1):
Arrow left icon
Tom Owsiak Tom Owsiak
Author Profile Icon Tom Owsiak
Tom Owsiak
Arrow right icon
View More author details
Toc

Table of Contents (60) Chapters Close

Preface 1. Why C# and How to Download and Install the Visual Studio Community Edition 2. Customizing Visual Studio to Make it Feel More Personal FREE CHAPTER 3. Creating and Running Your First Page 4. Creating and Running a Page That Incorporates C# 5. Creating and Using a Single Variable 6. String Interpolation and Updating Visual Studio 7. Formatting Output Strings for More Professional Results 8. Using Variables and Data Types 9. Computed Variables and Basic Math 10. Interacting with Users Through the Web Page 11. Using Method Chaining to Write More Compact Code 12. Reacting to a Single Condition with If/Else Blocks 13. Making a Variable Grow by Adding 1 14. Repeating Blocks of Code with While Loops 15. Repeating Blocks of Code with For Loops 16. Iterating Over Collections with foreach Loops 17. Examining Multiple Variable Values with Switch Blocks 18. Improving Input Processing with TryParse 19. Replacing If/Else Blocks with the Ternary Operator 20. Operators That Evaluate and Assign in Place 21. Checking Two Conditions with the Logical AND Operator 22. Checking Two Conditions with the Logical OR Operator 23. Declaring, Setting, and Reading Arrays 24. Iterating Over Arrays with foreach Loops 25. Creating and Using a Simple Method 26. Passing Arrays into Methods 27. Reference Type and Value Type Variables 28. Creating More Flexible Methods with the params Keyword 29. Creating More Flexible Functions with the out Keyword 30. Combining the ref and out Keywords to Write Flexible Functions 31. The out Keyword in C# 7 32. Multidimensional Arrays 33. Writing Easier Code with the Var and Dynamic Keywords 34. Creating a Class with a Constructor and a Function 35. Creating a Class with a Static Method 36. Creating a Class with an Object Property 37. Creating a Class with Static Fields, and Properties 38. Centralizing Common Code with Inheritance 39. Centralizing Default Code with Virtual Functions 40. Model Concepts with Abstract Classes 41. Using Custom Types as Return Types 42. Using Lists to Operate on Data Efficiently 43. Writing Less Code with Polymorphism 44. Using Interfaces to Express Common Behaviors 45. Iterating over Instances with Indexers 46. Building Stabler Apps with Exception Handling 47. Using Named and Optional Parameters 48. Using the Null Coalescing Operator to Write Stabler Applications 49. Overloading Operators to Perform Custom Operations 50. Using Enumerations to Represent Named Constants 51. Creating and Using Namespaces 52. Structs, Random Points, and Sleeping Threads 53. Declaring, Creating, and Using Delegates 54. Switch Blocks with when in C# 7.0 55. Switch Blocks with Objects in C# 7.0 56. Tuples in C# 7.0 57. Local functions in C# 7.0 58. Throwing Exceptions in C# 7.0 59. Tuples in C# 7.0, Part 2

Designing the starting markup

Let's begin with a simple markup page. Open Toolbox (Ctrl+Alt+X) and drag a Button control into the form so that you have something to click on. Change the displayed text so that the Button control says Show Product, for example. Then, place a Label control below the Button control line so that you have a place where the output should go. Your markup page should now look like the one shown in the following code block:
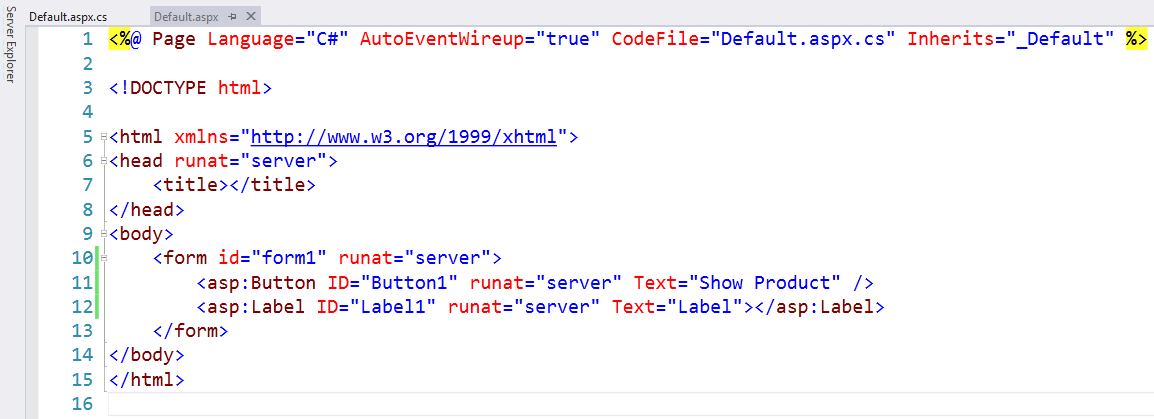
Figure 5.6.1: Our simple markup for this chapter

When you're learning, it's not good to have all the lines crammed together. So, separate the two lines by inserting a <br> tag at the end of the Button markup line. I've tried doing this by placing Label right after Button, but that gets really confusing when you're learning, so even a little <br> tag is helpful.

...
lock icon The rest of the chapter is locked
Register for a free Packt account to unlock a world of extra content!
A free Packt account unlocks extra newsletters, articles, discounted offers, and much more. Start advancing your knowledge today.
Unlock this book and the full library FREE for 7 days
Get unlimited access to 7000+ expert-authored eBooks and videos courses covering every tech area you can think of
Renews at $19.99/month. Cancel anytime
Banner background image