Fuzzing with Fuzzer
In this recipe, we are going to go over how to use the Fuzzer in ZAP Proxy and walk through how attackers use tools such as ZAP to brute force a password or attempt to gain access via trial and error using dictionary words in hopes of logging in to an application.
Getting ready
For you to be able to go over this recipe, you will need to have ZAP installed on your computer and also have it started and running. You will also need to run Juice Shop as shown in Chapter 1.
How to do it…
For the unaware, fuzzing is a term referring to a technique/automated process that submits a multitude of invalid or unexpected data points to a target to analyze the results for potentially exploitable bugs. The idea is to fuzz any input using built-in sets of payloads, any optional add-ons, or via custom scripts. In ZAP, this can be achieved in a few ways:
- Click the green + in the information window after the other add-ons (Alerts, Spider, and so on)
- Right-click a request in one of the tabs (Sites, History, and so on) and select Attack / Fuzz…
- Highlight a string in the headers or body of a request tab, right-click, and then select Fuzz…
- Select Tools / Fuzz… in the menu bar and select the request to fuzz
Tip
The shortcut hotkey is Ctrl + Alt + F.
To get started, once you’re on the information window of the Fuzzer add-on, click New Fuzzer to bring up any currently captured sites (see Figure 2.30) and their requests that come from a Spider scan:
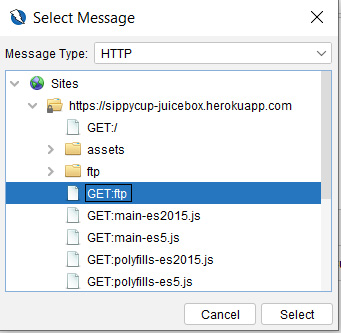
Figure 2.30 – The Fuzzer Select Message window
Once a request is selected, a new dialog window opens. In this window, you have several tabs to configure the fuzz. We’ll break each down in the following sections.
The Fuzz Locations tab
This is the main tab where you highlight the string of choice to begin fuzzing. To understand the windows you’re looking at, note that the top-left side of the dialog box showcases the header text, while the bottom left shows the body text. The right side of the screen shows the fuzz locations from what was added to the selected string(s) in the header. This location will be noted along with the number of payloads and processors. Furthermore, above the headers, you have a couple of dropdowns for the header and body text, as well as changing how you view the left dialog boxes, and an Edit feature. Edit allows you to modify the text within the header.
Important note
Editing the header string will automatically remove all the fuzzers you added.
To get started, highlight the specific area of the string, and click Add… on the right-hand side. This will open a new Payloads dialog box, and you will want to select Add… again to open another dialog box to select the type. The Type field has the Empty/Null, File (where you’d be adding a file from your host system directory), File Fuzzers (which consists of various payloads, that is, buffer overflow cramming, XSS exploits, director lists, and so on), Json (for JSON inputs), Numberzz (from 0 to 10 in increments of 2), Regex (with a number of payloads), Script, and Strings options:
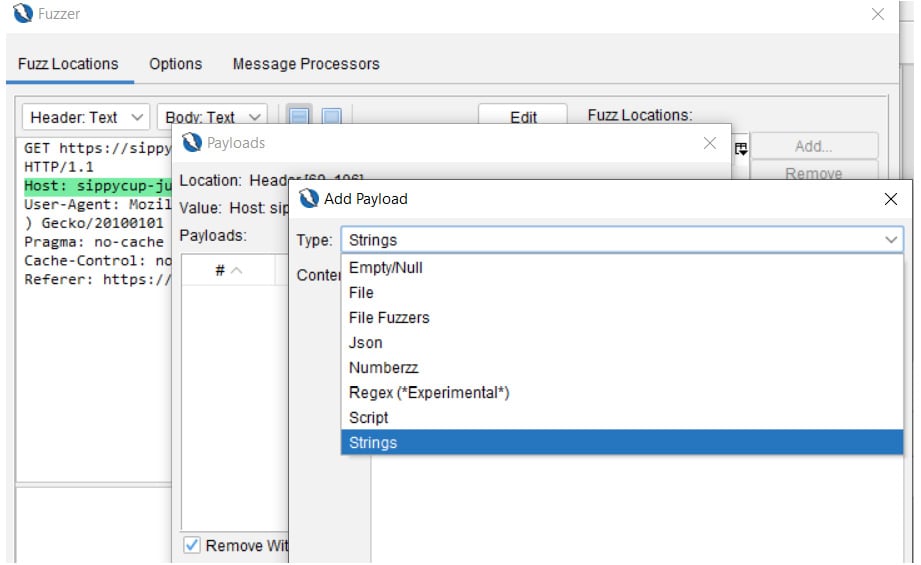
Figure 2.31 – Payloads | Add Payload
Another feature within Payloads is Processors, as you can see in Figure 2.32. This allows you to change and process the current payload into a different type, such as converting it into Base64-encoded format. You can add several types, then select Add… and OK. This is a way to encode, decode, and hash the fuzzing payload prior to starting the fuzzer.
In addition, processors can be applied to either a specific fuzzing payload (outlined in red) or to the entirety of the string selected (outlined in blue) shown in Figure 2.32. There’s also a counter to show how many processors have been applied:
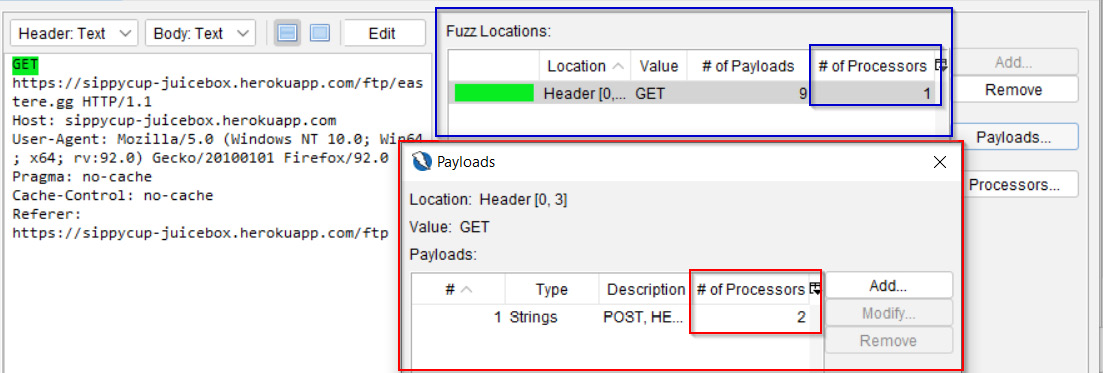
Figure 2.32 – Processors
Once a processor type has been selected, click Add at the bottom of the dialog box, then click OK. This will add the payloads to Fuzz Locations, as seen in Figure 2.32. Once you have everything entered as desired, select Start Fuzzer in the bottom-right corner. Once fuzzing is complete, the information window will display the results:
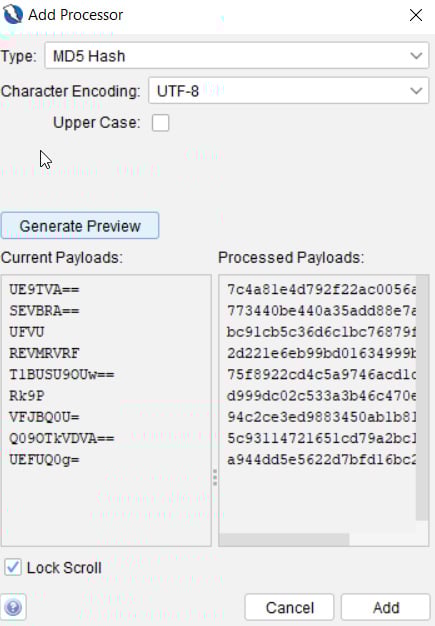
Figure 2.33 – Add Processor
From left to right, in Figure 2.34, the results that appear in the information window will showcase the task number, message type, HTTP status (Code), a reason, such as Forbidden or Bad Request, the round trip time (RTT), the size of the response header/response body, the highest alert, the state, and the payloads used. In addition, the results can be exported to a CSV spreadsheet. Last to note is the Progress drop-down menu. This keeps track of every fuzzed string and allows you to switch between the results.

Figure 2.34 – The Fuzzer Information window
The Options tab
When starting a new fuzzer, you’ll have an Options tab (Figure 2.35). This tab lets you configure more options for the fuzzer:
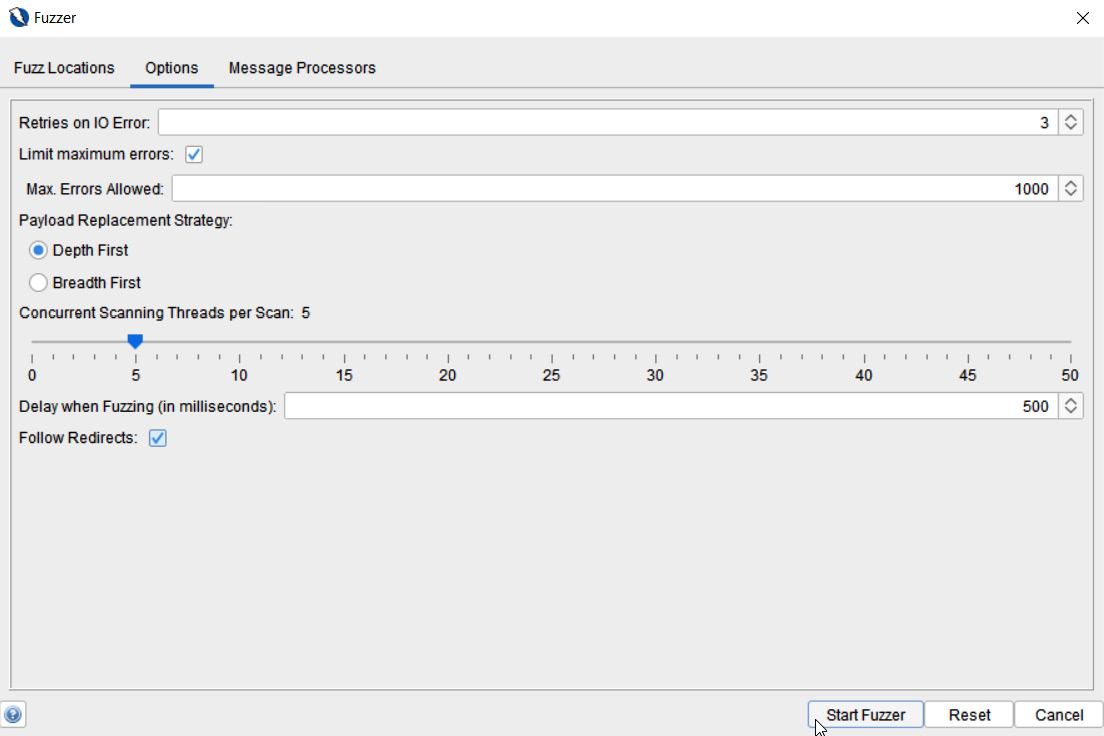
Figure 2.35 – Fuzzer Options
These options are as follows:
- Retries on IO Error: Determines how many retries the fuzzer will do when input/output errors occur.
- Max. Errors Allowed: This will stop the fuzzer if the number of errors reaches this number.
- Payload Replacement Strategy: Controls the order for multiple payloads lists repeated. The two options are as follows:
- Depth First
- Breadth First
- Concurrent Scanning Threads per Scan: The number of threads a scan will conduct simultaneously. Increasing this number will speed up the scan but may stress the computer that ZAP is running on or the target.
- Delay when Fuzzing (in milliseconds): Creates a delay between requests to the target, which helps avoid being blocked or if the target has restrictions against too many requests.
- Follow Redirects: Will continue fuzzing by following the next request.
The Message Processors tab
The last tab, as shown in Figure 2.36, is the HTTP Message Processors tab, which can access and change the messages being fuzzed, control the process, and interact with the ZAP GUI:
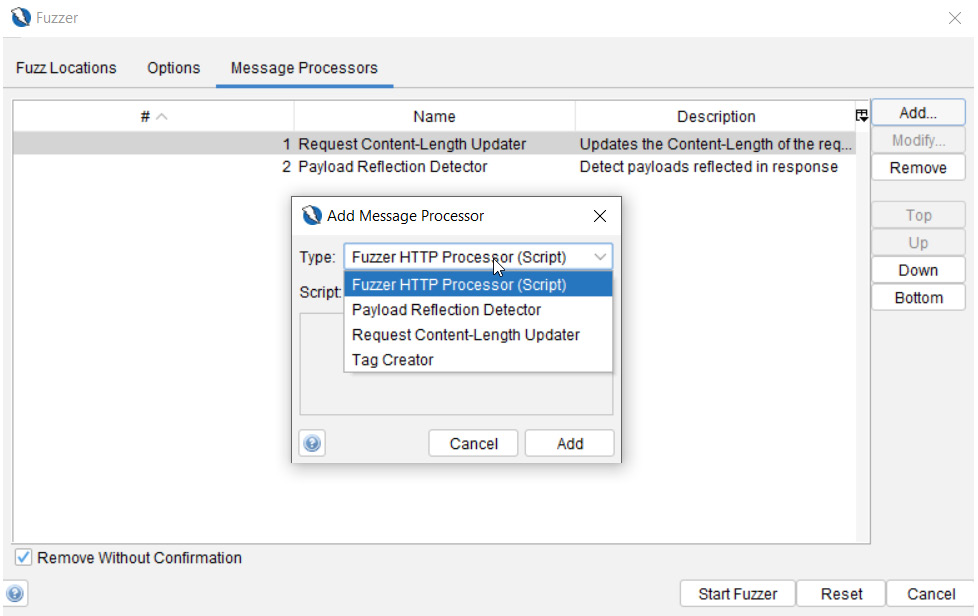
Figure 2.36 – Fuzzer Message Processors
Here are the types of message processors to know about. Keep in mind, a few of these will not work or be available, depending on the type of response seen or whether scripts are already built:
- Anti-CSRF Token Refresher: Allows a refresh of anti-CSRF tokens in a request but must be detected by ZAP to be used in this processor. Automatically added if an anti-CSRF token is detected.
- Fuzzer HTTP Processor (Script): Allows you to select enabled scripts if scripts have been added to ZAP.
- Payload Reflection Detector: This feature will let you know if a payload was found and uses a symbol (yellow sun icon) with the word Reflected to indicate this as well. This process is automatically added.
- Request Content-Length Updater: Updates or adds the content-length request header with the length of the body. This process is automatically added.
- Tag Creator: Adds custom tags based on content in the response to the state column in the results.
- User Message Processor: Fuzz a user. Users must exist to be able to select and add this processor.
Congratulations! You are now armed with an in-depth understanding of all the features, layouts, tabs, trees, and options of ZAP.
How it works…
The processors are ways to add more customization to fuzzing and increase the depth and obfuscation, or help bypass those pesky web application firewalls (WAFs) for an assessment against your target.
There’s more…
Using operating systems such as Kali or Parrot will come with wordlists already installed, and for other ways to generate wordlists, utilize tools such as CeWL, which scrapes words from a targeted web application, or John the Ripper, which comes with options for customizing wordlists.
See also
Check out the GitHub pages for great sources for obtaining already-built wordlists to quickly add to ZAP when it comes to fuzzing.


