Search icon CANCEL
Subscription
0
Cart icon
Your Cart (0 item)
Close icon
You have no products in your basket yet
Arrow left icon
Explore Products
Best Sellers
New Releases
Books
Videos
Audiobooks
Learning Hub
Free Learning
Arrow right icon
Arrow up icon
GO TO TOP
Oracle Primavera P6 Version 8: Project and Portfolio Management

You're reading from   Oracle Primavera P6 Version 8: Project and Portfolio Management For project managers and consultants, this book will help you master the main elements of Primavera P6, together with the new features in Version 8. Lots of screenshots and clear explanations make for an easy ride.

Arrow left icon
Product type Paperback
Published in Aug 2012
Publisher Packt
ISBN-13 9781849684682
Length 348 pages
Edition 1st Edition
Arrow right icon
Toc

Table of Contents (25) Chapters Close

Oracle Primavera P6 Version 8: Project and Portfolio Management
Credits
About the Authors
About the Reviewers
www.PacktPub.com
Preface
1. Getting Started with Oracle Primavera P6 2. Getting Around: Understanding and Customizing the P6 Interface FREE CHAPTER 3. Organizing your Projects with EPS, OBS, and WBS 4. Creating a New Project and Work Breakdown Structure 5. Adding Activities and Relationships 6. Resources 7. Scheduling and Constraints 8. Issues and Risks 9. Baselines and Statusing 10. Project Templates 11. Portfolios 12. Portfolio Analysis 13. Measuring and Scoring Projects 14. Capacity Planning and ROI 15. Dashboards 16. Resource Management Integrations Reporting Index

Creating a new project from a template


Now that we have created a template, let's see how to use it. Imagine that you are starting five new projects, all of which share common features, such as WBS milestones and activity codes. Rather than typing the same information into each of the five projects, we will use a template to create all of them so that they are uniform to begin with.

From the main menu on the Projects screen, choose the Add Project icon shown as follows:

You can also use the button on the toolbar as shown in the following screenshot:
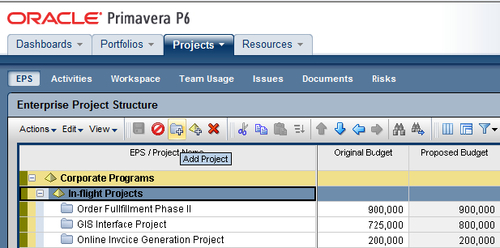
Then fill in the appropriate Project ID, Project Name, and Description in the pop-up window that appears. Using the hierarchy icon to the right of the EPS field, select the area of the EPS the project should reside within. In the Responsible Manager field, select from the OBS an appropriate assignment—remember this is a security setting allowing all those within that level of OBS to have access to this new project:
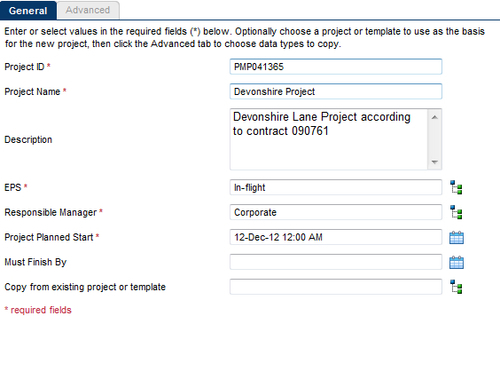
The Project Planned Start date...

lock icon The rest of the chapter is locked
Register for a free Packt account to unlock a world of extra content!
A free Packt account unlocks extra newsletters, articles, discounted offers, and much more. Start advancing your knowledge today.
Unlock this book and the full library FREE for 7 days
Get unlimited access to 7000+ expert-authored eBooks and videos courses covering every tech area you can think of
Renews at $19.99/month. Cancel anytime
Banner background image