Project Tasks – Building a Multi-Account Strategy for TodoPlus Limited
While understanding theoretical knowledge of the various services offered on the AWS platform is paramount to passing the exam, developing real-world, hands-on experience is critical if you are to succeed as a developer or even a DevOps engineer on the AWS platform. This is what companies looking to hire new talent are always on the lookout for.
As discussed earlier in this chapter, you will apply the knowledge gained in the study guide to fulfill the business requirements of a fictitious company called TodoPlus Limited. This will help you develop much-needed hands-on experience to help you secure your next job role. In the following project task series, you will design and build a multi-account environment for TodoPlus Limited. You will also set up an AWS Organization and define the necessary OUs and SCPs.
Project Task 1.1 – Setting up Your First AWS Account
In this exercise, you will set up your first AWS account for our client, TodoPlus Limited. You will be using this AWS account to configure an AWS Organization from which you can create the additional two accounts discussed in the Technical Requirements section of this chapter. You will use these accounts throughout this exam guide to gain valuable hands-on experience and prepare for the AWS Certified Developer Associate exam:
- Using your web browser, navigate to https://aws.amazon.com/free/.
- Click the Create a Free Account button to set up your first AWS Free Tier account. You will be presented with a signup screen.
- For Root user email address, provide your management account email address as previously discussed in the Technical Requirements section.
- For the account name, enter the value
TodoPlus Management. - Click on the Verify email address button, as shown in Figure 1.7:
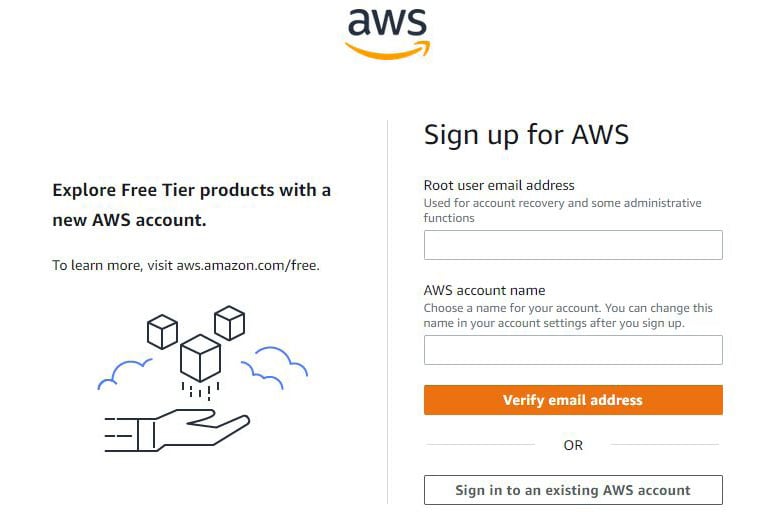
Figure 1.7 – Setting up an AWS Free Tier account
- You will then be presented with a Confirm who you are dialog box, where you must verify the email address you used to create this account. Log in to your Gmail account and obtain the verification code sent to you. Type the code in the Verification code textbox and click the Verify button, as per Figure 1.8:
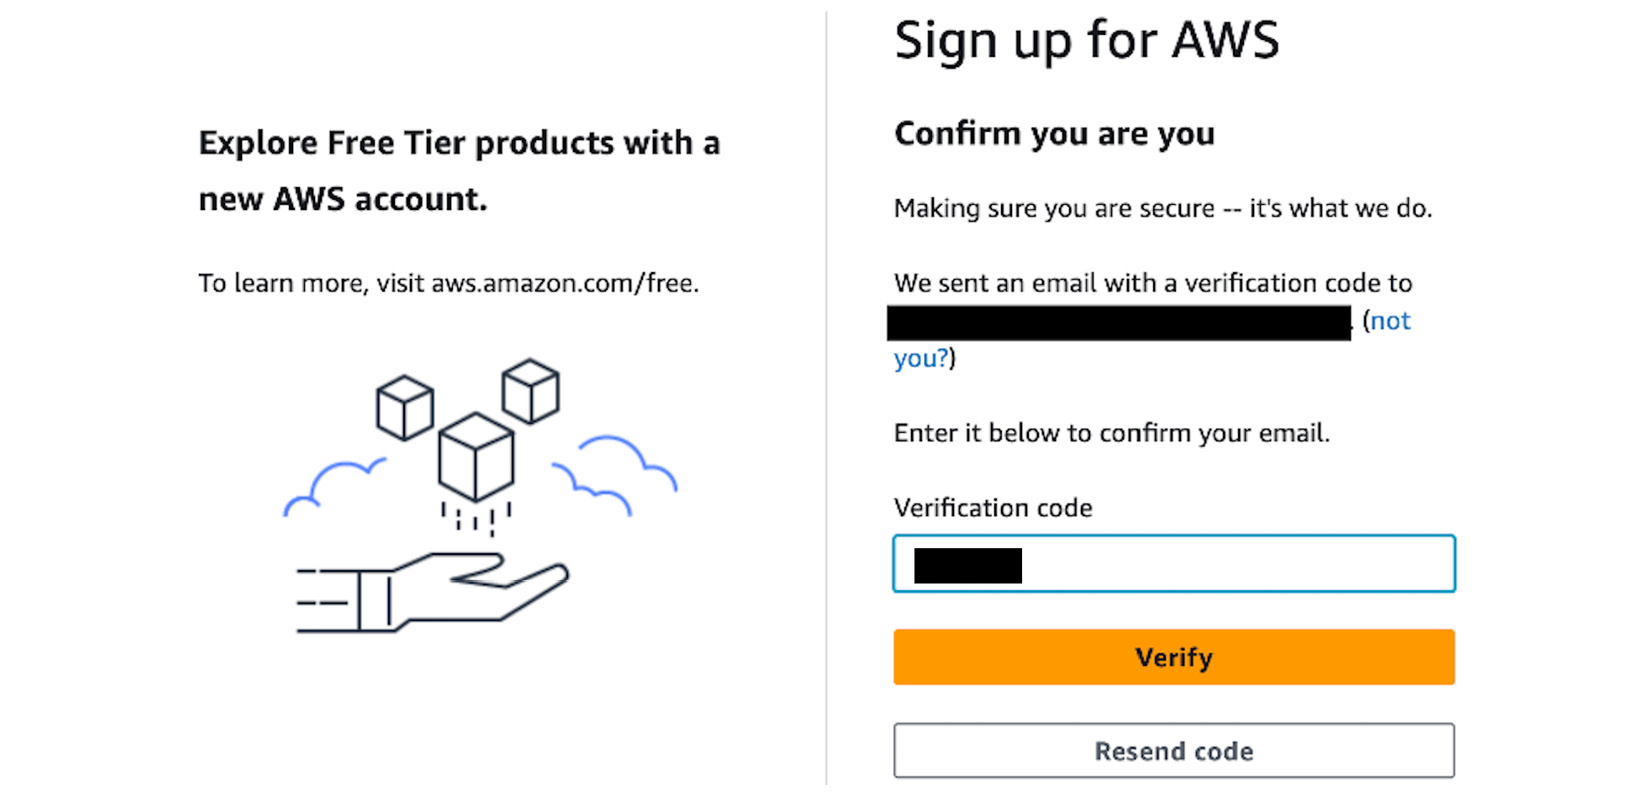
Figure 1.8 – Providing the verification code
- You need to create a password for this account. This will be the root user’s password. Provide a complex password comprising lowercase letters, uppercase letters, numbers, and at least one non-alphanumeric character. Click Continue (step 1 of 5).
- For Contact information, provide your full contact and address details. Select the Personal - for your own projects option. Ensure that you select the checkbox stating that you agree to the terms of the AWS Customer Agreement and click Continue (step 2 of 5).
- Provide your Billing Information details and click Continue (step 3 of 5). You will need access to a credit or debit card and your billing address details.
- The next step involves providing your mobile phone number for verification purposes. You can choose to have a text message (SMS) sent to you or a voice call. To complete, click on Text Message (SMS) and provide your phone number.
- Type in the characters in the captcha box and click on Send SMS (step 4 of 5).
- You will now be presented with a Confirm your identity page. Check your phone for the code from Amazon and then type the code in the Verify code textbox on your signup page, as shown in Figure 1.9:
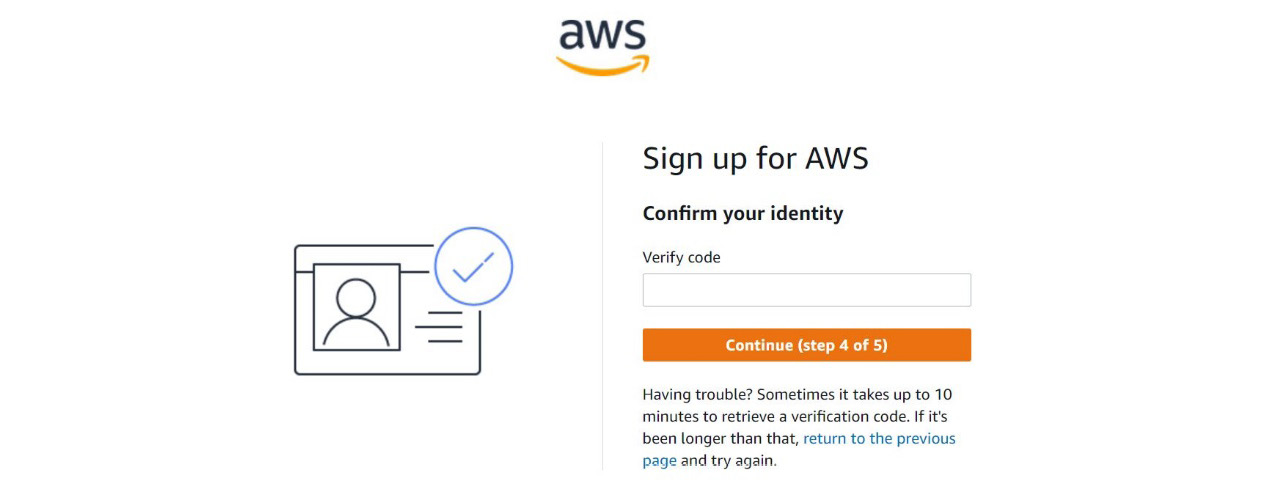
Figure 1.9 – Signing up for AWS – Verify code page
- As a next step, you will need to select an AWS support plan for your account. For now, choose the Basic support – Free plan and click the Complete sign up button. You will now see a congratulations screen and will be able to navigate to the main sign-in page.
Congratulations, you have now created your first AWS account! You can now log in to your AWS account using the email address and password you defined earlier. Next, you should consider securing your account further. Right now, it is possible to access your account with just an email address and a password. AWS offers another mechanism to strengthen your account security: multi-factor authentication.
Multi-factor authentication (MFA) provides multiple authentication mechanisms before granting access to the service or resource. On AWS, this takes the form of what you know and what you have. The what you know part refers to the email address and password you have memorized. It’s a set of credentials that you know. The what you have part further enhances your account security because you need a dynamic piece of information that changes regularly when logging in. If you have an online bank account, you have probably used MFA before: you log in to your account with a username and password and then also receive a PIN to your mobile device, which usually consists of a time-sensitive code that you need to provide as part of your authentication process.
Similarly, you can set up your account on AWS with MFA. In addition to an email address (or a username for IAM users discussed in the next chapter), you can also set up an MFA device. This can be a physical or virtual device, such as an MFA app on your smartphone. The MFA device generates a one-time PIN (OTP). This OTP is time-sensitive, and you must supply the PIN quickly during your authentication process.
In the next project task, you will learn how to set up MFA for the root user of your management account. You will need access to a smartphone with internet access to complete the next project task.
Project Task 1.2 – Configuring MFA for Your Root User
In this exercise, you will set up and configure MFA for the root user of your AWS management account:
- Before setting up MFA on your management account, you must install an MFA application on your smartphone. Google Authenticator is one such app that you can download and install on your phone. You will find it on both Apple App Store and Google Play Store.
- Log in to your AWS account.
- From the top search bar, search for
IAMand navigate to the IAM web console. - On the main IAM dashboard, you should see a security recommendation suggesting that you add MFA for the root user, as per the following screenshot:
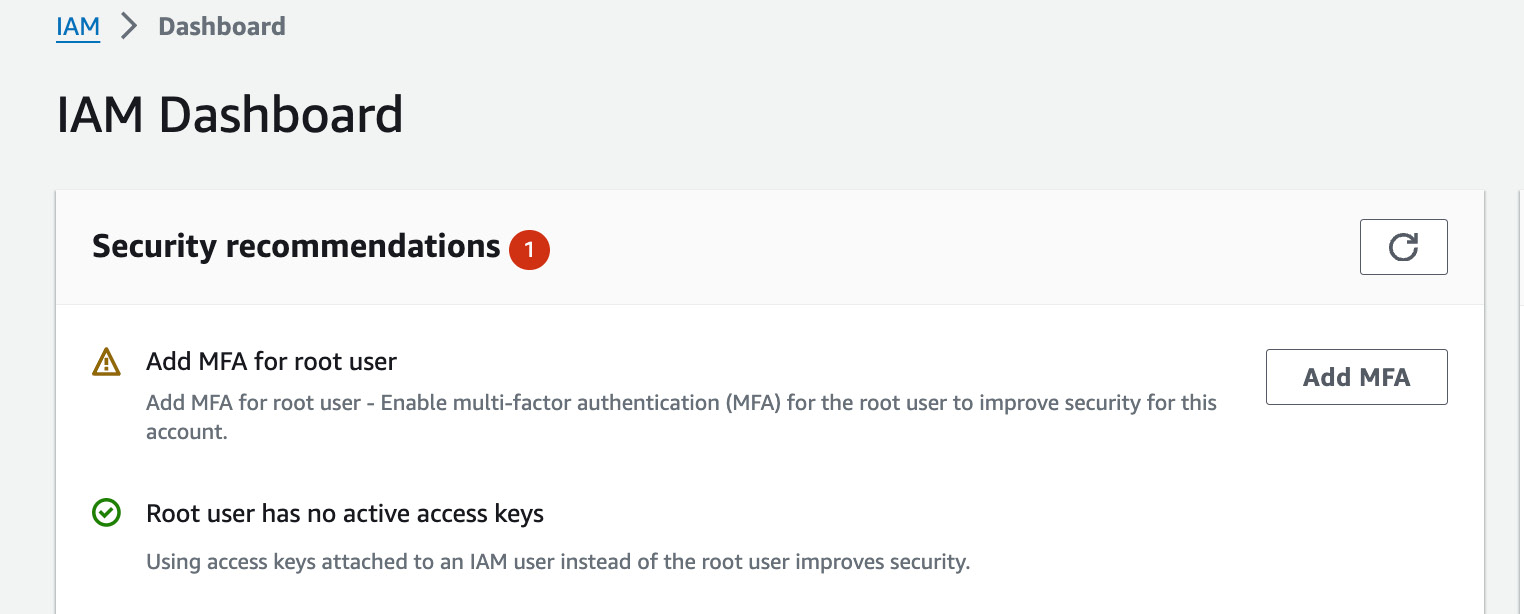
Figure 1.10 – Setting up MFA for the root user
- Click the Add MFA button.
- Provide a name for your MFA device.
- Select the Authenticator app option under MFA device.
- Click Next and you will be directed to the Set up device web page.
- You will need to perform the following steps on your smartphone:
- Launch the Google Authenticator app on your phone. If prompted, ensure that you allow access to the camera.
- Click the plus (+) icon in the Google Authenticator app and select the Scan a QR code option. This will launch your camera app on the phone. There is also the option to enter a setup key if your camera is not working.
- Back in the AWS Management Console, within the wizard, click the Show QR code link on the Set up device page, as per the following screenshot:
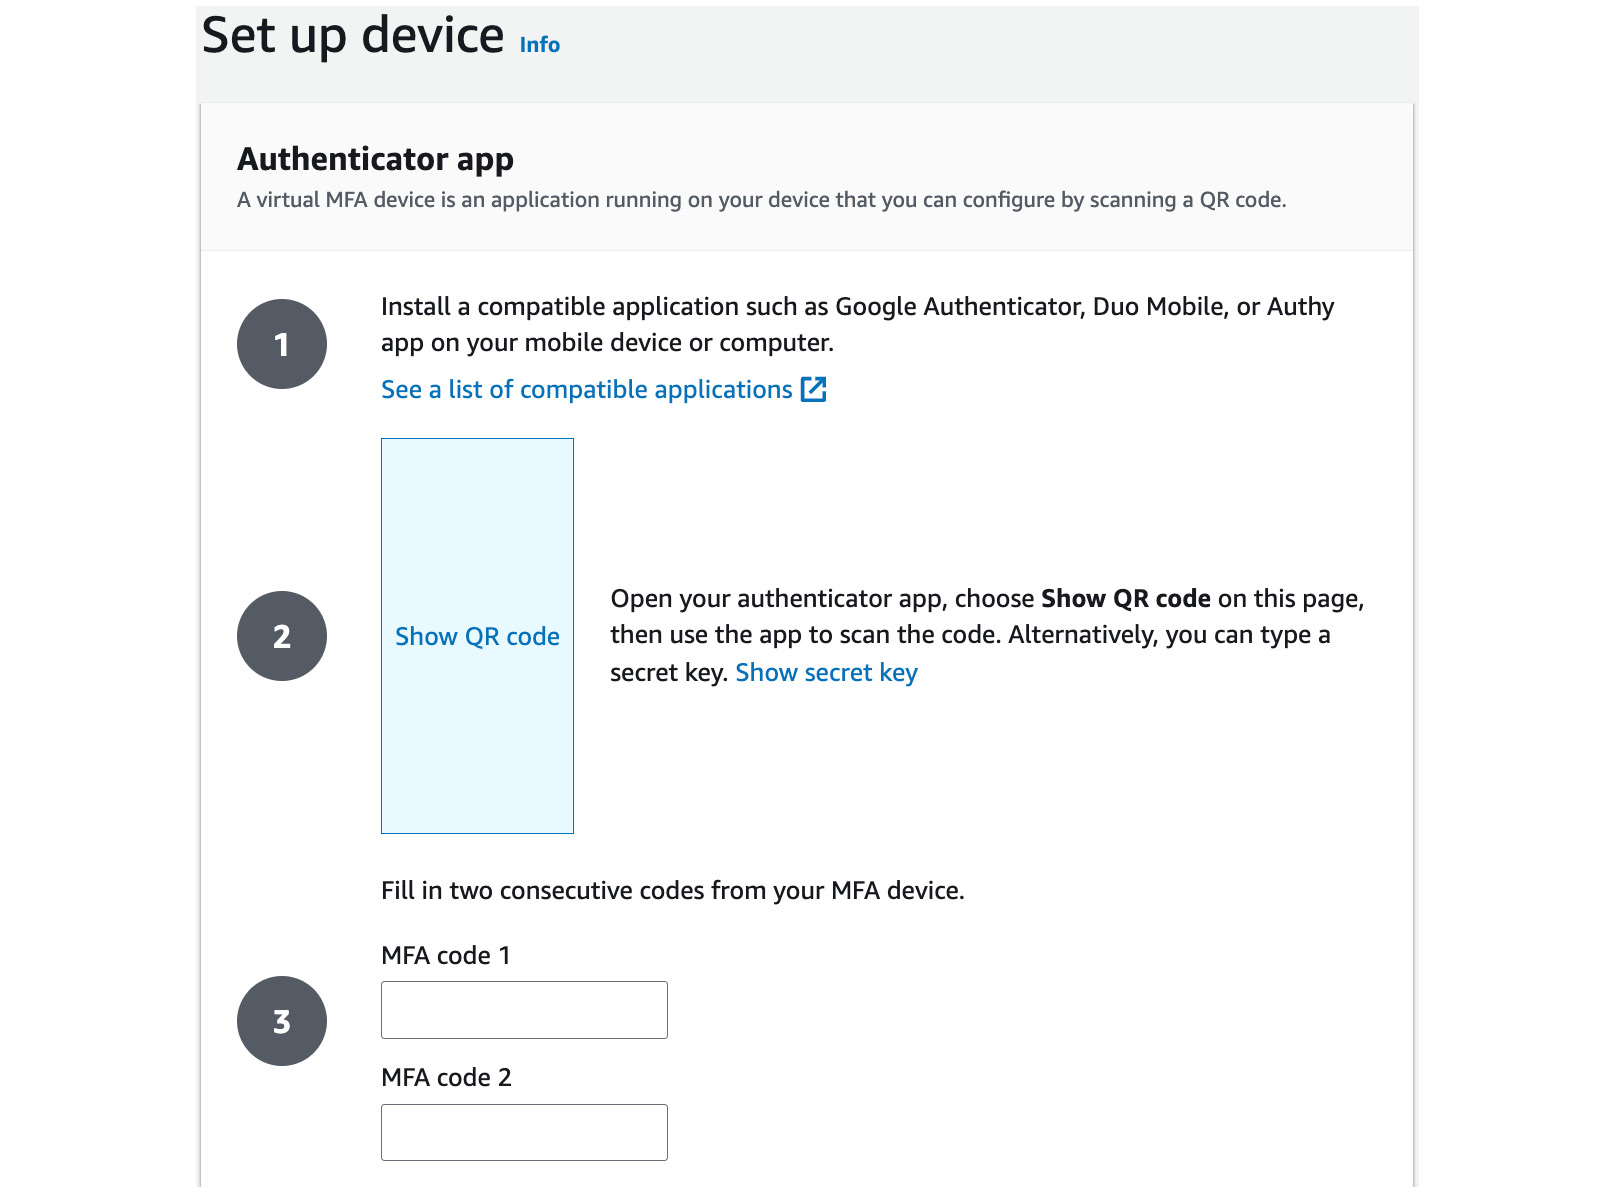
Figure 1.11 – Show QR code
- Your QR code will be displayed. Position your smartphone camera as though you want to take a picture of the QR code.
- The app will scan the QR code and add the AWS account to the device. It will display an OTP comprising six digits that expires after a few seconds, after which, another PIN is displayed, and this cycle of new PIN generation continues after a few seconds. Provide the PIN in the sequence displayed for MFA code 1 and MFA code 2, and ensure you click the Add MFA button before the second PIN expires. This will associate the Google Authenticator app and the specific virtual device on your phone with your AWS account.
- When you next log in to your AWS account and provide your root user credentials, you will be prompted to provide the OTP. You will need to launch the app on your phone and then provide the current displayed OTP for your AWS account to be able to log in.
In the next task, you will learn how to configure your AWS management account with AWS Organizations so that you can centrally create and manage other AWS accounts.
Project Task 1.3 – Setting up an AWS Organization
In this exercise, you will log in to the AWS account you created and configure the AWS Organizations service. For our client, TodoPlus, this AWS account will be the management account for your AWS Organizations configuration, allowing us to create additional AWS accounts for the development and production environments for our application:
- Log in to your AWS account to access the Console Home page. From this page, you can access all AWS services by clicking on the Services link in the top-right corner of the screen or directly searching for the service name in the search box at the top.
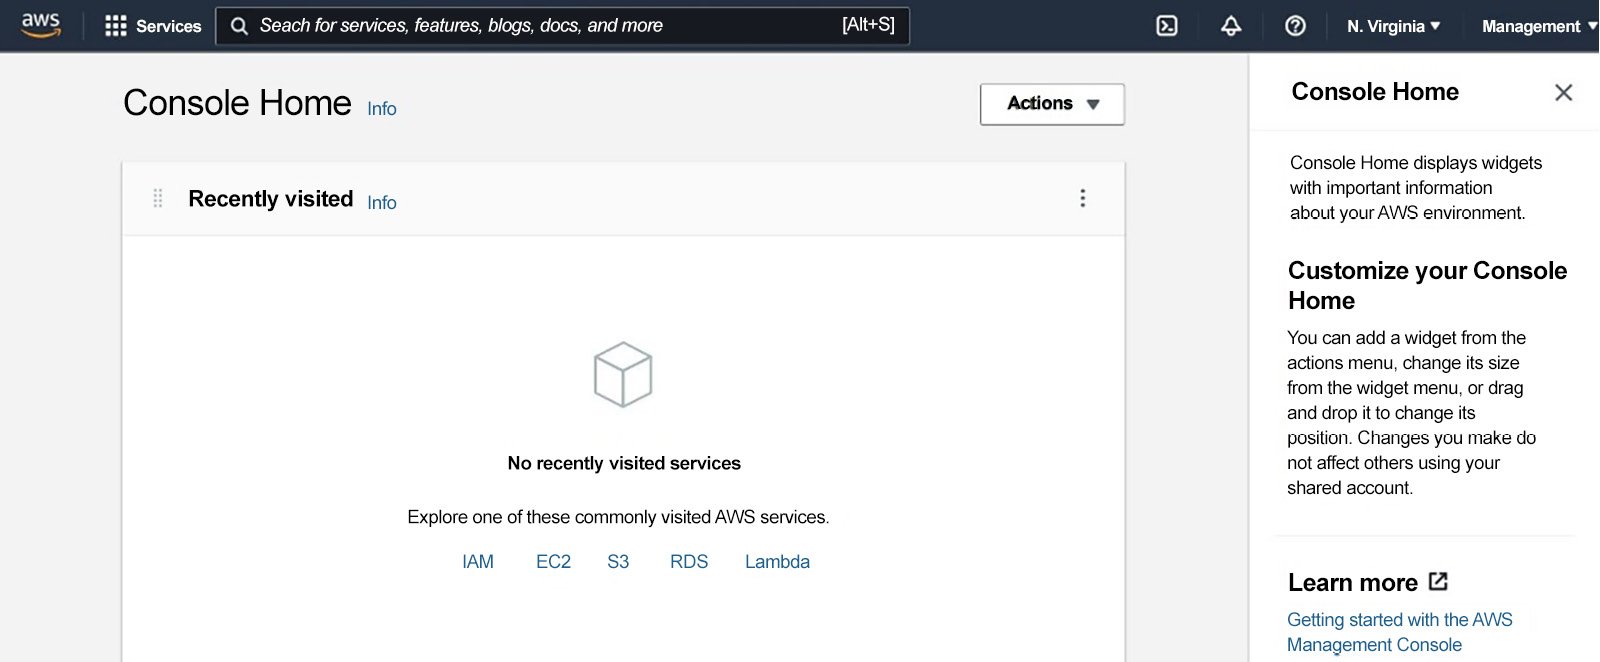
Figure 1.12 – AWS Management Console
- In the top search box, type in
AWS Organizationsand select the service from the drop-down menu, as per the following screenshot:

Figure 1.13 – Searching for services using the search box on the AWS Management Console
- You will be directed to the AWS Organizations console page.
- Click the Create an organization button in the top-right corner of the screen. This will create your AWS organization and configure your AWS account to become the primary root management account, as shown in Figure 1.14. This account can then host other member AWS accounts, apply security policies, and act as a central billing account for all members’ AWS accounts.
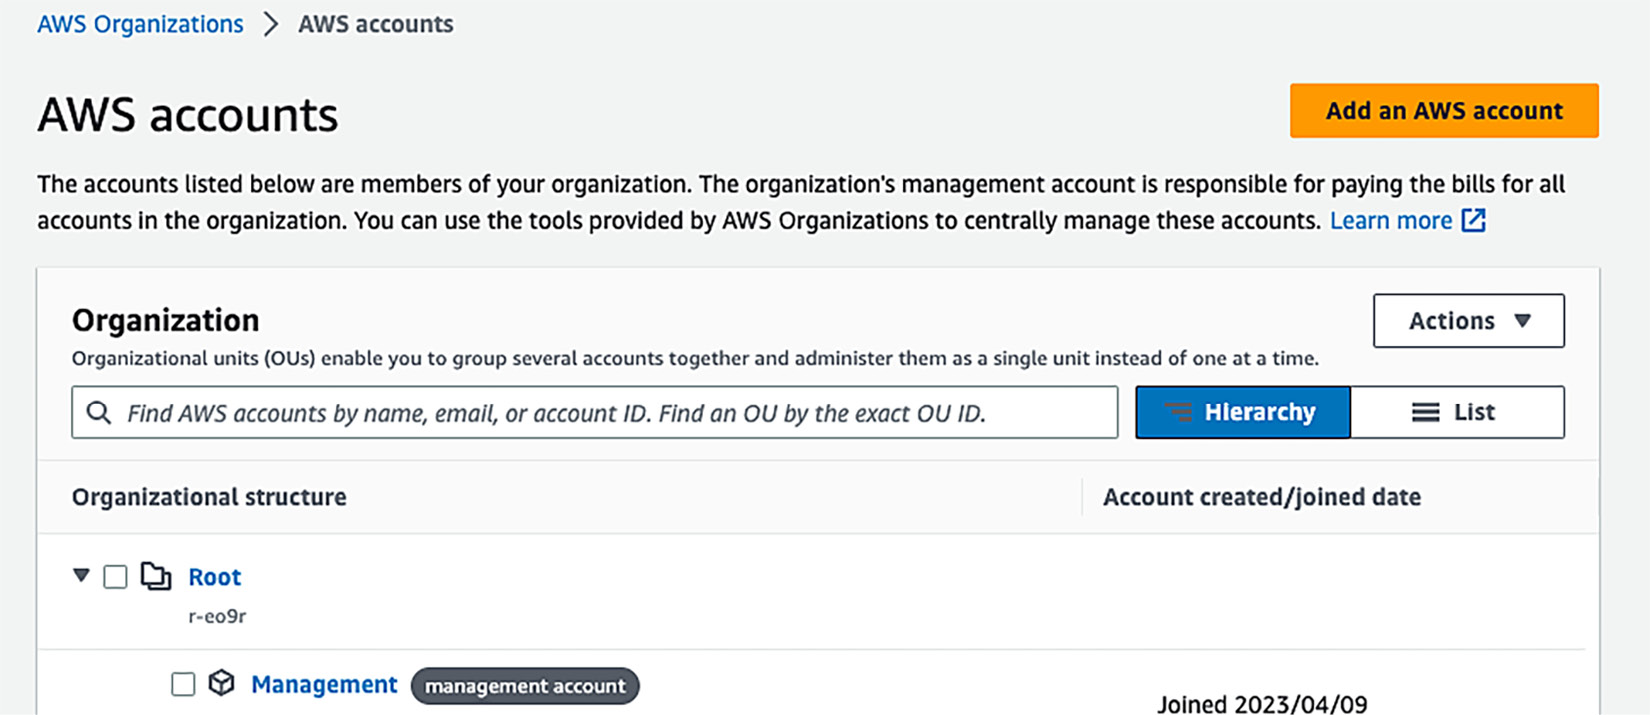
Figure 1.14 – AWS Organizations
Now that you have created your AWS Organizations, it’s time to configure some OUs. These OUs enable us to manage multiple accounts that share common workload types, for example, software development environments such as development, testing, and production.
- Click the checkbox to select Root under Organizational Structure.
- Click on the Actions drop-down menu and select Create new under Organization unit; you will be taken to the Create organizational unit in the Root page.
- Type
DevelopmentOUunder Organizational unit name. - Click Add tag in the Tags section. Tags are key-value pairs that you can add to AWS resources to help identify, organize, and secure your AWS resources. You can have up to 50 tags per resource. Create two tags, one with a key of
Nameand a value ofDevelopmentOU, and the other with a key ofProjectand a value ofProductivityApps, as per Figure 1.15:
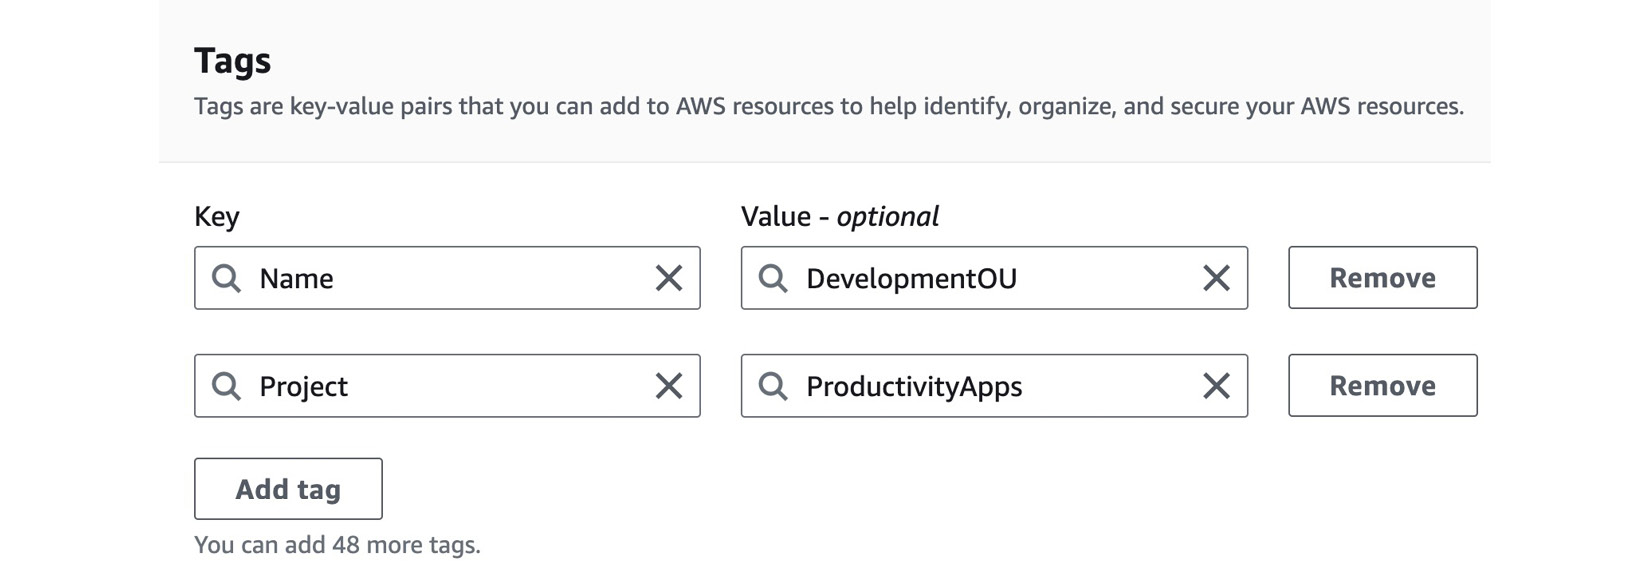
Figure 1.15 – AWS Organization Tags
- Click Create organizational unit.
- Repeat steps 5 to 9 to create another OU for ProductionOU, so that you now have two OUs in your organization, as per Figure 1.16:
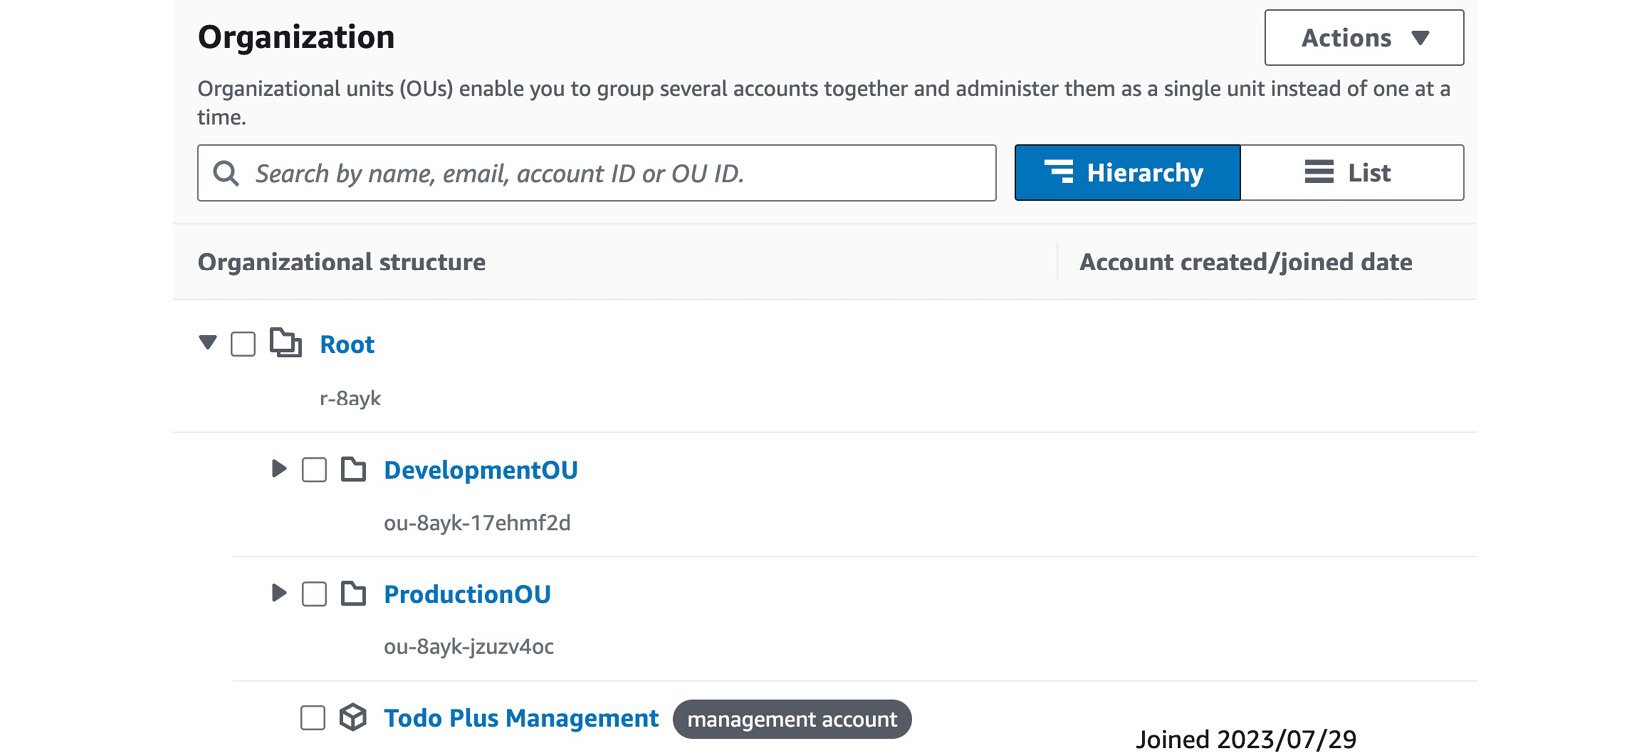
Figure 1.16 – AWS Organizations OUs
Now that you have created your OUs for the organization, it is time to create additional AWS accounts, which is described in the next exercise.
Project Task 1.4 – Creating the Development and Production AWS Accounts
In this exercise, you will create two additional AWS accounts: development and production. Later in this study guide, you will learn how to build workloads in those accounts and will also be introduced to how application development will transition from the development to production environments following best practices. Follow these steps:
- Log back into your AWS account and navigate to the AWS Organizations management console if necessary.
- From the left-hand menu, ensure that AWS Accounts is selected.
- In the right-hand pane, click on the Add an AWS account button.
- You will have the option to create a new AWS account or to invite an existing one. Select the Create an AWS account option.
- Under the Create an AWS account section, provide a name for your AWS account – in this case, it will be
TodoPlus Development. - For the email address, provide the development email alias, as explained in the Technical Requirements section earlier in this chapter.
- You will also notice that the IAM role is prefilled with the role of OrganizationAccountAccessRole (discussed in detail in the next chapter). This enables the management account to access resources in member accounts.
- Click Add tag in the Tags section. Create two tags, one with a key of
Nameand a value ofDevAccount, and the other with a key ofProjectand a value ofProductivityApps. - Click Create AWS account.
- AWS will take a few moments to create your new AWS development account.
Each AWS account you create in this way will have a root user for that account. The root user is defined by the email address you use to create the account. Note that you did not set a password. To define a password for the root user of your member accounts, you must request a password reset on those accounts from the main AWS sign-in page. A password reset link will be sent to the member AWS account root user’s email address, allowing you to set up a complex password. You can then log in to those member AWS accounts.
Repeat steps 1 to 10 to set up another AWS account for production workloads. Ensure you name this account Todo Plus Production. For the tags, create one with a key of Name and a value of ProdAccount, and the other with a key of Project and a value of ProductivityApps.
Now that you have set up your development and production accounts, it would be advisable to place these accounts in the appropriate OUs you had set up in the previous exercise, which you will configure in the next exercise.
Project Task 1.5 – Assigning AWS Accounts to Their Respective OUs
In this exercise, you will be associating the accounts you created in the previous exercise with their relevant OUs:
- While still in the AWS Organizations console, click to select the Todo Plus Development account under Organizational structure.
- Click Move from the Actions drop-down menu under the AWS account.
- You will be navigated to the Move AWS account ‘Todo Plus Development’ page.
- Select DevelopmentOU under Destination.
- Click the Move AWS account button.
- Repeat steps 1 to 5 for the Todo Plus Production account and ensure that you move the account to ProductionOU, as shown in Figure 1.17:
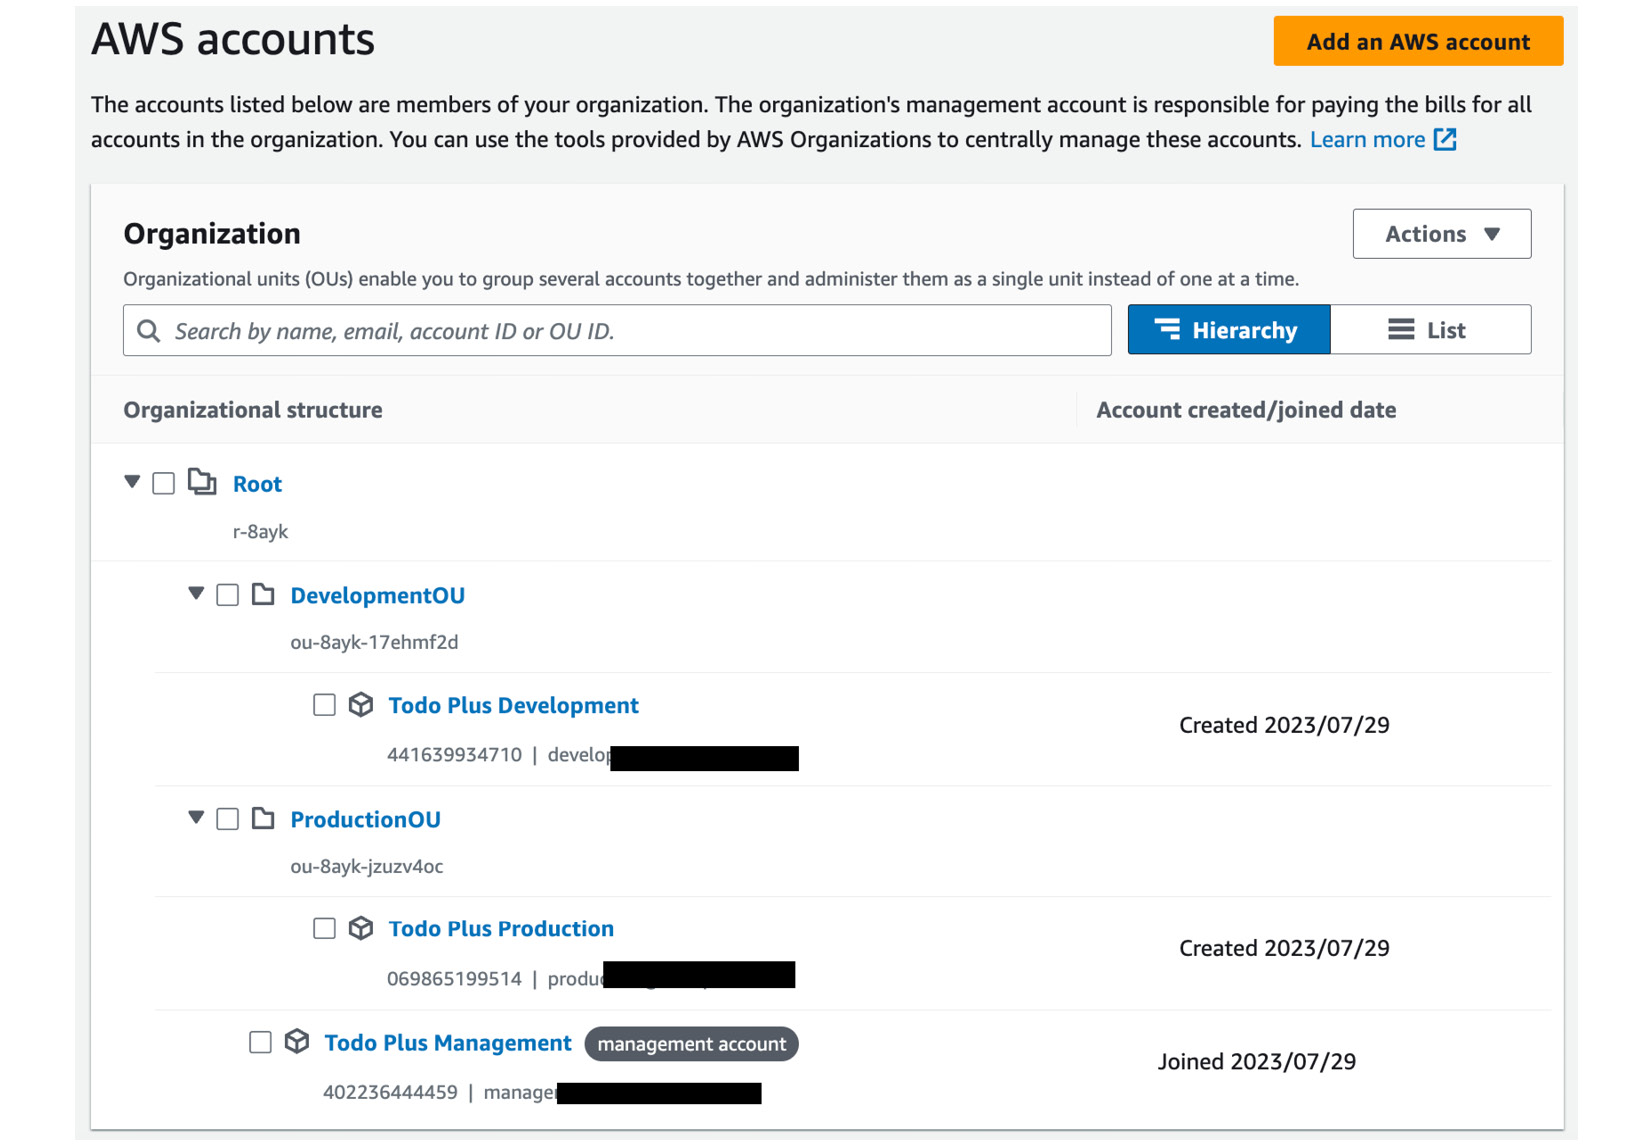
Figure 1.17 – Structuring your AWS accounts with OUs
In this exercise, you have moved the AWS accounts you created earlier into their relevant AWS Organizations OUs. In the next exercise, you will learn how to enable SCPs and apply a new SCP to your OUs.
Project Task 1.6 – Setting up SCPs
In this exercise, you will enable SCP policies and apply an SCP for both the development and production AWS accounts:
- If necessary, log back into your AWS account and navigate to the AWS Organizations console.
- From the left-hand menu, click on Policies.
- In the right-hand pane, click on Service Control Policies, where you will be taken to the SCPs page.
- Click on the Enable service control policies button.
- Your AWS organization’s SCP feature has now been enabled. You will also notice that the default policy applied to the management account, OUs, and member accounts is the FullAWSAccess policy.
You can now create various SCPs and apply them to both OUs and directly to AWS accounts. These policies can restrict various types of access, services, and even which regions you can access. One SCP that you should consider creating is a policy to deny member accounts from leaving the organization. Recall that every AWS account has a root user. This root user can remove the account from an AWS Organization. In large enterprise environments, you may wish to enforce a policy preventing root users from removing their accounts from the organization, whether due to an accident or malicious intent. In the next steps, you can configure a policy to deny root users of member accounts this ability.
- While in the AWS Organizations console, click on Policies from the left-hand menu and then click the Create policy button.
- For Policy Name, enter
DenyOrgLeaveand provide an appropriate description for your policy. - Scroll further down and in the Edit statement block, replace the existing policy with the following policy:
{"Version": "2012-10-17","Statement": [
{"Effect": "Deny",
"Action": [
"organizations:LeaveOrganization"
],
"Resource": "*"
}
]
}
Recheck your policy as per Figure 1.18 shown here:

Figure 1.18 – SCP to prevent administrators of member accounts from leaving the organization
- Scroll down and click the Create policy button. You should now be able to see the list of policies available in your organization, as shown in Figure 1.19:
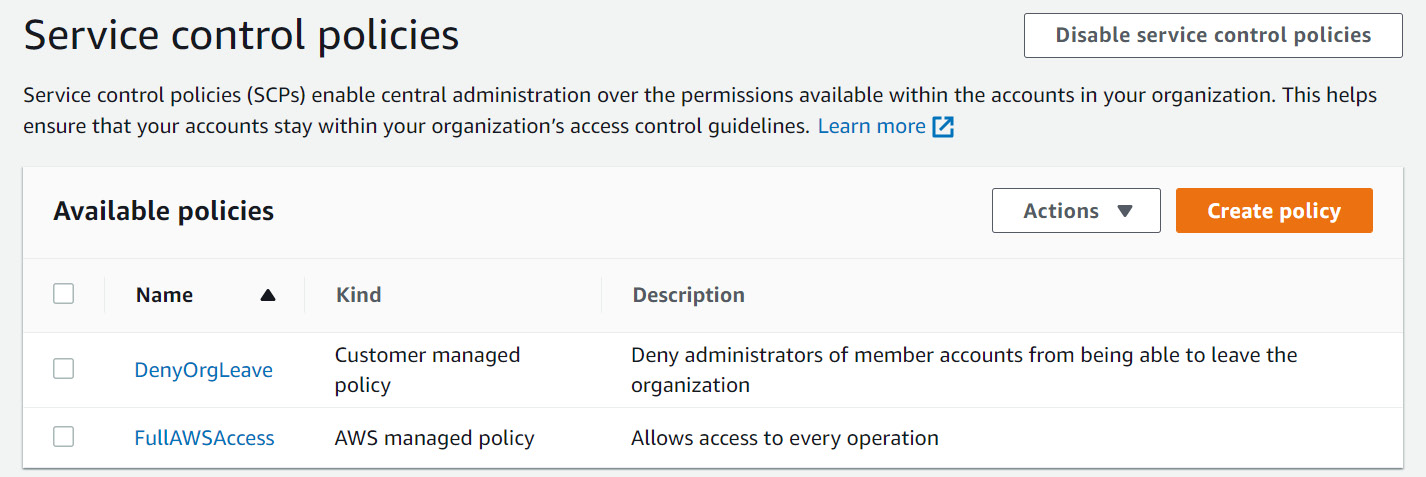
Figure 1.19 – List of available SCPs
- Click to select the DenyOrgLeave policy and then, from the Actions drop-down menu, click Attach policy.
- Next, click both the Production and Development OUs.
- Click the Attach policy button.
- From the left-hand menu, click Accounts.
- Next, in the right-hand pane, expand the Development OU.
- Click on Todo Plus Development account. This will take you to the member account details page.
- In the lower half of the right-hand pane, click the Policies tab. You should find both the FullAWSAccess and DenyOrgLeave policies listed. Some full access permissions are also inherited from the root account.
In this exercise, you configured SCPs that are not enabled by default and then set up a new SCP to prevent administrators of member accounts from leaving the organization. In the next exercise, you will test out this policy on the Todo Plus Development account.
Project Task 1.7 – Testing SCPs
To complete this exercise, log in to the Todo Plus Development AWS account. Since you only know the email address for the account but not the password, you will need to reset the password. You must first provide your email address and complete the Captcha challenge. Next, follow the processes on the root user sign-in page to reset the password by clicking on the Forgot Password link:
- You will be sent a password reset email to the address you provided when setting up the Todo Plus Development AWS account earlier. Ensure that you use the link in the email to reset the password. Once you have reset your password, you can log in to the AWS account.
- Search for
AWS Organizationsand navigate to its Management Console page. You will note that this account is a member of the Management AWS organization. - Scroll further down and click on the Leave this organization button. You will be prompted to confirm your action. Click the Leave organization button.
- You should see an error message that reads You don’t have permissions to access this resource., as shown in Figure 1.20:
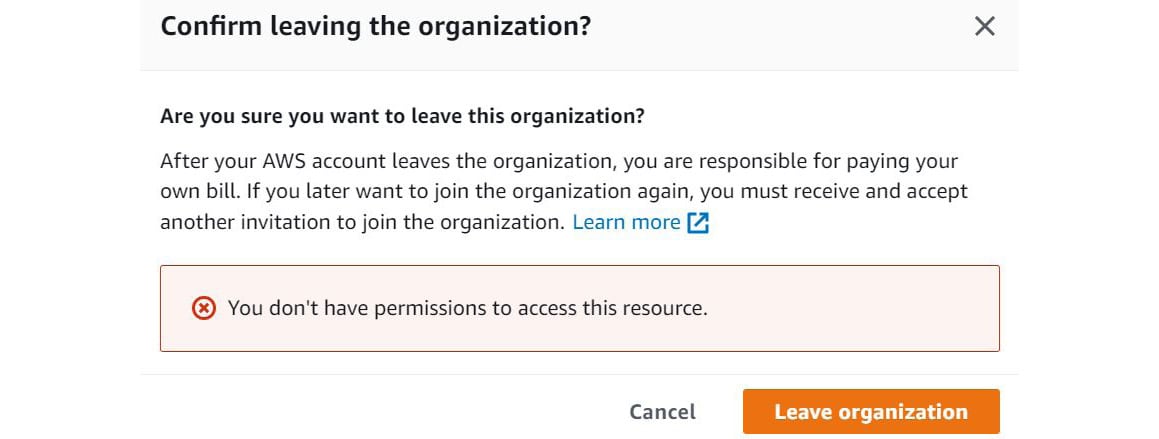
Figure 1.20 – SCPs prevent the root user of DevAccount from leaving the organization
As you can see, even the root user of the Todo Plus Development account can now not leave the organization. Ultimately, this policy will ensure that only the administrator of the management account can control the membership of member accounts.
Now that you have configured your AWS accounts and defined an AWS organization, you are ready to start working on the project tasks in the rest of this study guide. However, before proceeding with the project tasks, it is strongly recommended that you create a billing alarm to notify you if you cross the recommended budget of 25 USD in your exercises. It is advised that you complete the exercises in this book as quickly as possible so that you do not incur unnecessary charges. Once you have completed the project exercises and tested the solution, you must terminate the resources you deploy to avoid incurring further costs.
Project Task 1.8 – Creating a Billing Alarm
In this project task, you will create a billing alarm to notify you if cross the 25 USD spend budget:
- Ensure that you are logged in to the management account.
- In the top-right corner of the screen, click on Todo Plus Management and select Billing and Cost Management, as per the following screenshot:
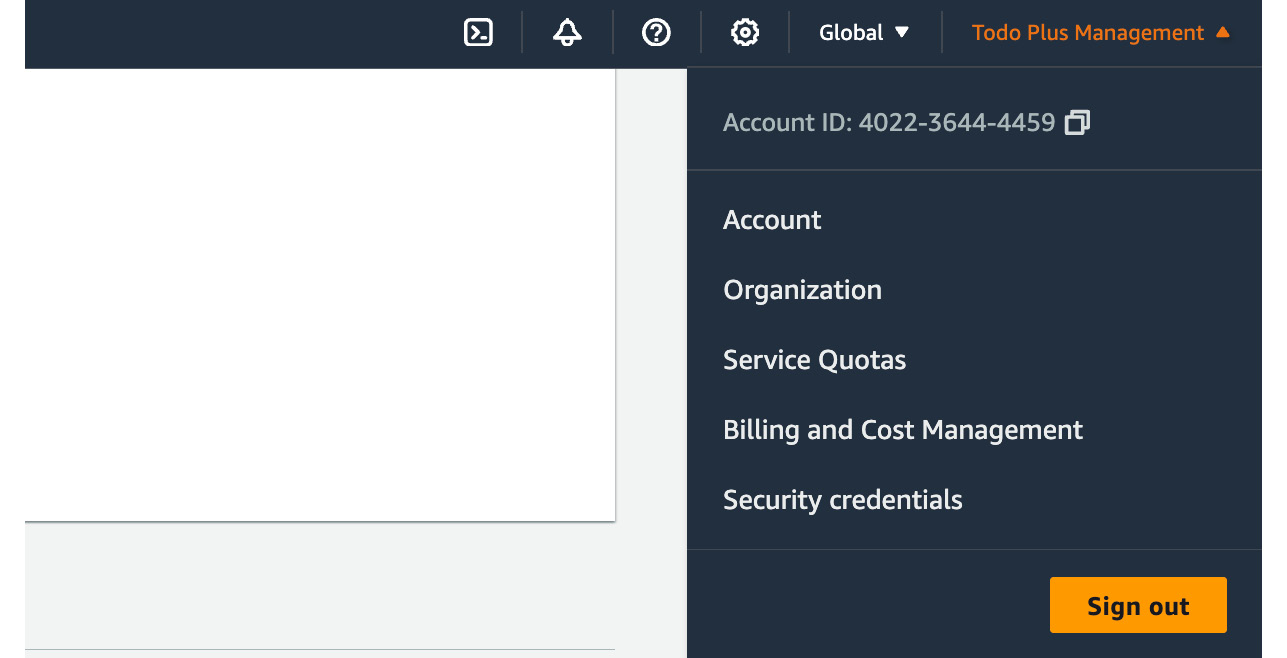
Figure 1.21 – Accessing the Billing and Cost Management console
- In the Billing and Cost Management console, select Billing Preferences from the left-hand menu under Preferences and Settings.
- Click the Edit button in the Alert preferences section, as per the following screenshot:

Figure 1.22 – Alert preferences setting
- Ensure that you select the checkbox next to Receive CloudWatch billing alerts and click Update.
- Using the top search bar, search for
CloudWatchand navigate to the Amazon CloudWatch console. - In the CloudWatch console, from the left-hand menu, click Billing under Alarms.
- Click the Create alarm button and you will be presented with a four-step wizard to create your billing alarm:
- Step 1: Specify metric and conditions – In this step, ensure that Static is selected under Threshold type. Next, select Greater as the alarm condition in the Whenever EstimatedCharges is... section, as per the following screenshot. Also, set the USD amount to
25.
- Step 1: Specify metric and conditions – In this step, ensure that Static is selected under Threshold type. Next, select Greater as the alarm condition in the Whenever EstimatedCharges is... section, as per the following screenshot. Also, set the USD amount to
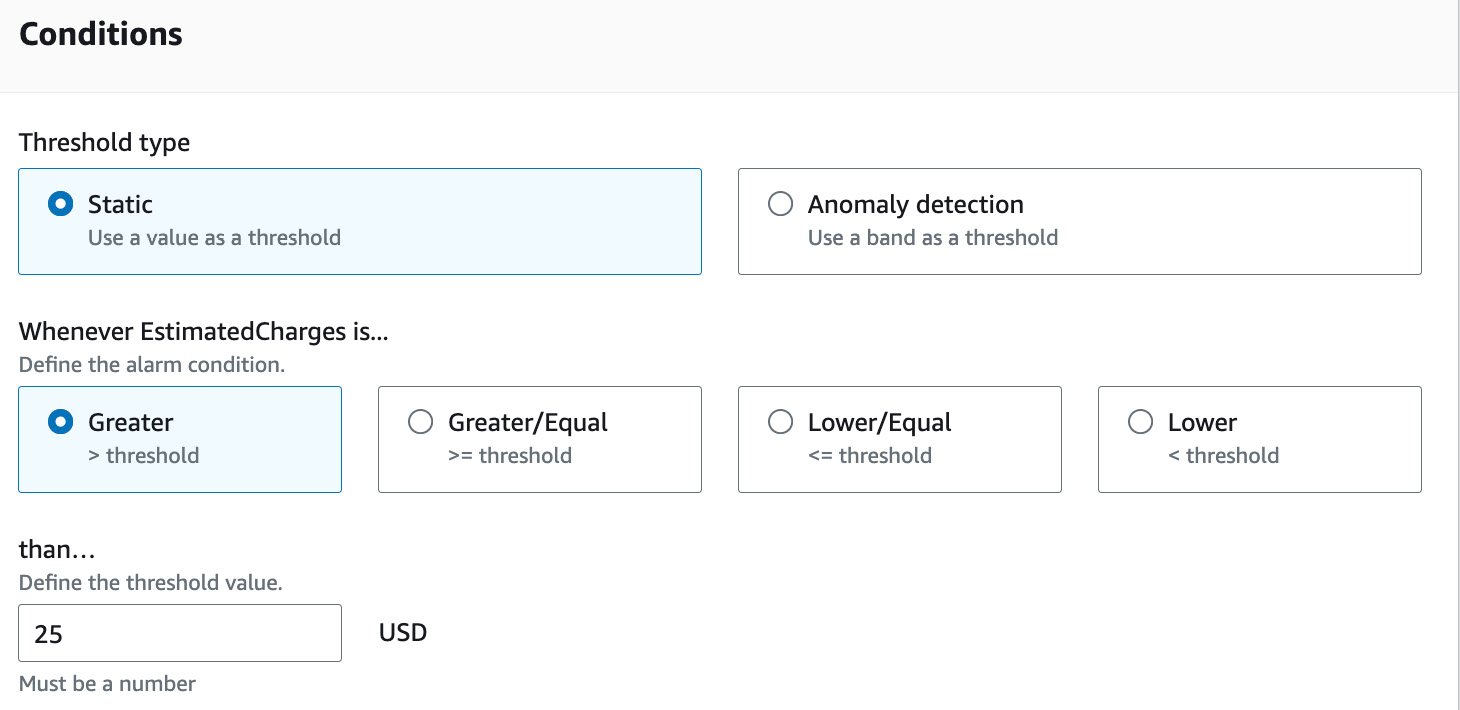
Figure 1.23 – Configuring billing alarm conditions
Click Next.
- Step 2: Configure actions – In this step, select In alarm under Alarm state trigger.
Click Create a new topic.
Provide a descriptive name under Create a new topic…. For example, you can provide a name such as TodoPlus-Billing-Alarm.
Provide an email address where you would like to receive the alert, and then click Create topic, as per the following screenshot:
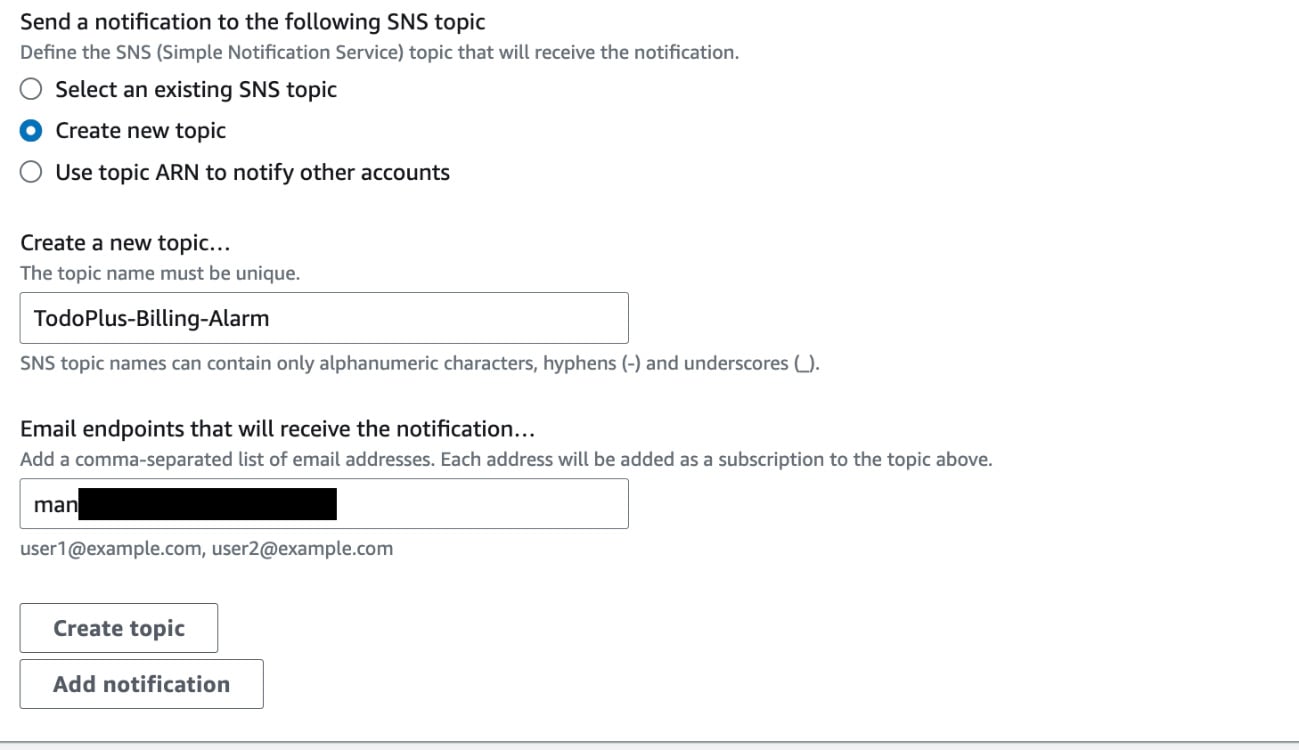
Figure 1.24 – Creating a notification topic and defining an email endpoint
Scroll to the bottom of the screen and click Next.
- Step 3: Add name and description – In this step, you will define the alarm name and an optional description.
Click Next.
- Step 4: Preview and create – In this step, you will review the settings and then click the Create alarm button at the bottom of the screen.
- Although you have now created the alarm, you will not be able to receive the email alerts until you verify your subscription to the notification topic. To do this, you must log in to the email account that you specified in the previous steps and confirm your subscription.
In the next section, we will provide a summary of this chapter.


