Search icon CANCEL
Subscription
0
Cart icon
Your Cart (0 item)
Close icon
You have no products in your basket yet
Arrow left icon
Explore Products
Best Sellers
New Releases
Books
Videos
Audiobooks
Learning Hub
Free Learning
Arrow right icon
Arrow up icon
GO TO TOP
Hands-On C++ Game Animation Programming

You're reading from   Hands-On C++ Game Animation Programming Learn modern animation techniques from theory to implementation with C++ and OpenGL

Arrow left icon
Product type Paperback
Published in Jun 2020
Publisher Packt
ISBN-13 9781800208087
Length 368 pages
Edition 1st Edition
Languages
Tools
Concepts
Arrow right icon
Author (1):
Arrow left icon
Gabor Szauer Gabor Szauer
Author Profile Icon Gabor Szauer
Gabor Szauer
Arrow right icon
View More author details
Toc

Table of Contents (17) Chapters Close

Preface 1. Chapter 1: Creating a Game Window 2. Chapter 2: Implementing Vectors FREE CHAPTER 3. Chapter 3: Implementing Matrices 4. Chapter 4: Implementing Quaternions 5. Chapter 5: Implementing Transforms 6. Chapter 6: Building an Abstract Renderer 7. Chapter 7: Exploring the glTF File Format 8. Chapter 8: Creating Curves, Frames, and Tracks 9. Chapter 9: Implementing Animation Clips 10. Chapter 10: Mesh Skinning 11. Chapter 11: Optimizing the Animation Pipeline 12. Chapter 12: Blending between Animations 13. Chapter 13: Implementing Inverse Kinematics 14. Chapter 14: Using Dual Quaternions for Skinning 15. Chapter 15: Rendering Instanced Crowds 16. Other Books You May Enjoy

Understanding cubic Bézier splines

To implement game animation, you need some understanding of curves. Let's start with the basics—a cubic Bézier spline. A Bézier spline has two points to interpolate between and two control points that help generate a curve. This is what a cubic Bézier spline looks like:
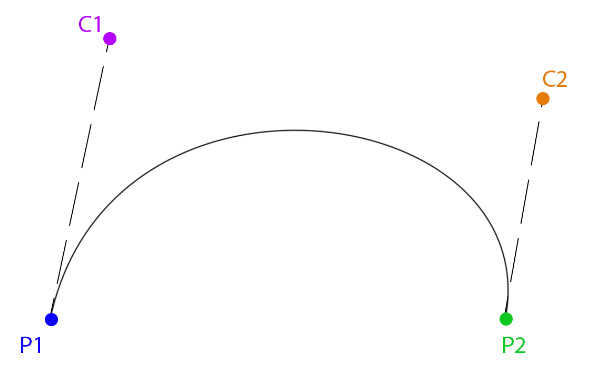
Figure 8.2: A cubic Bézier spline

Figure 8.2: A cubic Bézier spline

Given the two points and the two controls, how is the curve generated? Let's explore interpolating the curve for a given time, t. Start by drawing a line from P1 to C1, from C1 to C2, and from C2 to P2. Then, linearly interpolate along those lines with the value of t:
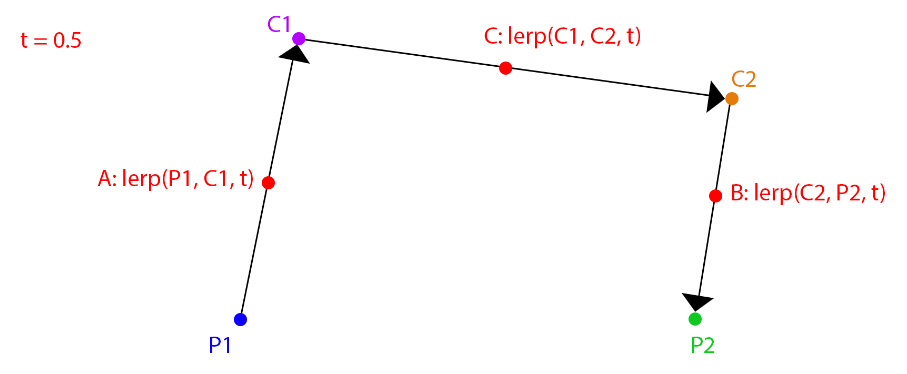
Figure 8.3: Linearly interpolating between points and control points

Figure 8.3: Linearly interpolating between points and control points

The interpolated points from P1 to C1 is A, from C2 to P2 is B, and from C1 to C2 is C. Next, you need to repeat this process, drawing lines and interpolating from A to C and from C to B. Let's call these newly...

lock icon The rest of the chapter is locked
Register for a free Packt account to unlock a world of extra content!
A free Packt account unlocks extra newsletters, articles, discounted offers, and much more. Start advancing your knowledge today.
Unlock this book and the full library FREE for 7 days
Get unlimited access to 7000+ expert-authored eBooks and videos courses covering every tech area you can think of
Renews at $19.99/month. Cancel anytime
Banner background image